Introduction
Watch My Wallet is an expense tracker that helps you create and monitor your budget. It uses budget categories, expenses and categorisation rules for expenses to create and track a comprehensive budget , also predicting your spending over the year. Watch My Wallet does not use the concept of accounts, instead keeping things simple by tracking only your expenses.
The screenshots on this page are taken from an iPhone in light mode, but dark mode screens are essentially the same barring some change in icons and colours.
Getting Started
When you first open the app there won't be any data and getting started might feel a bit overwhelming. No worries! Head to the 'Load Sample Data' option in the menu. This will load a few categories and expenses to help you get the feel of what sort of categories you can create. These can be edited or removed with a swipe so have a play around. If you want to create some completely different categories, you can always go to Settings and clear all the data to start again.
Main Page Tabs
General
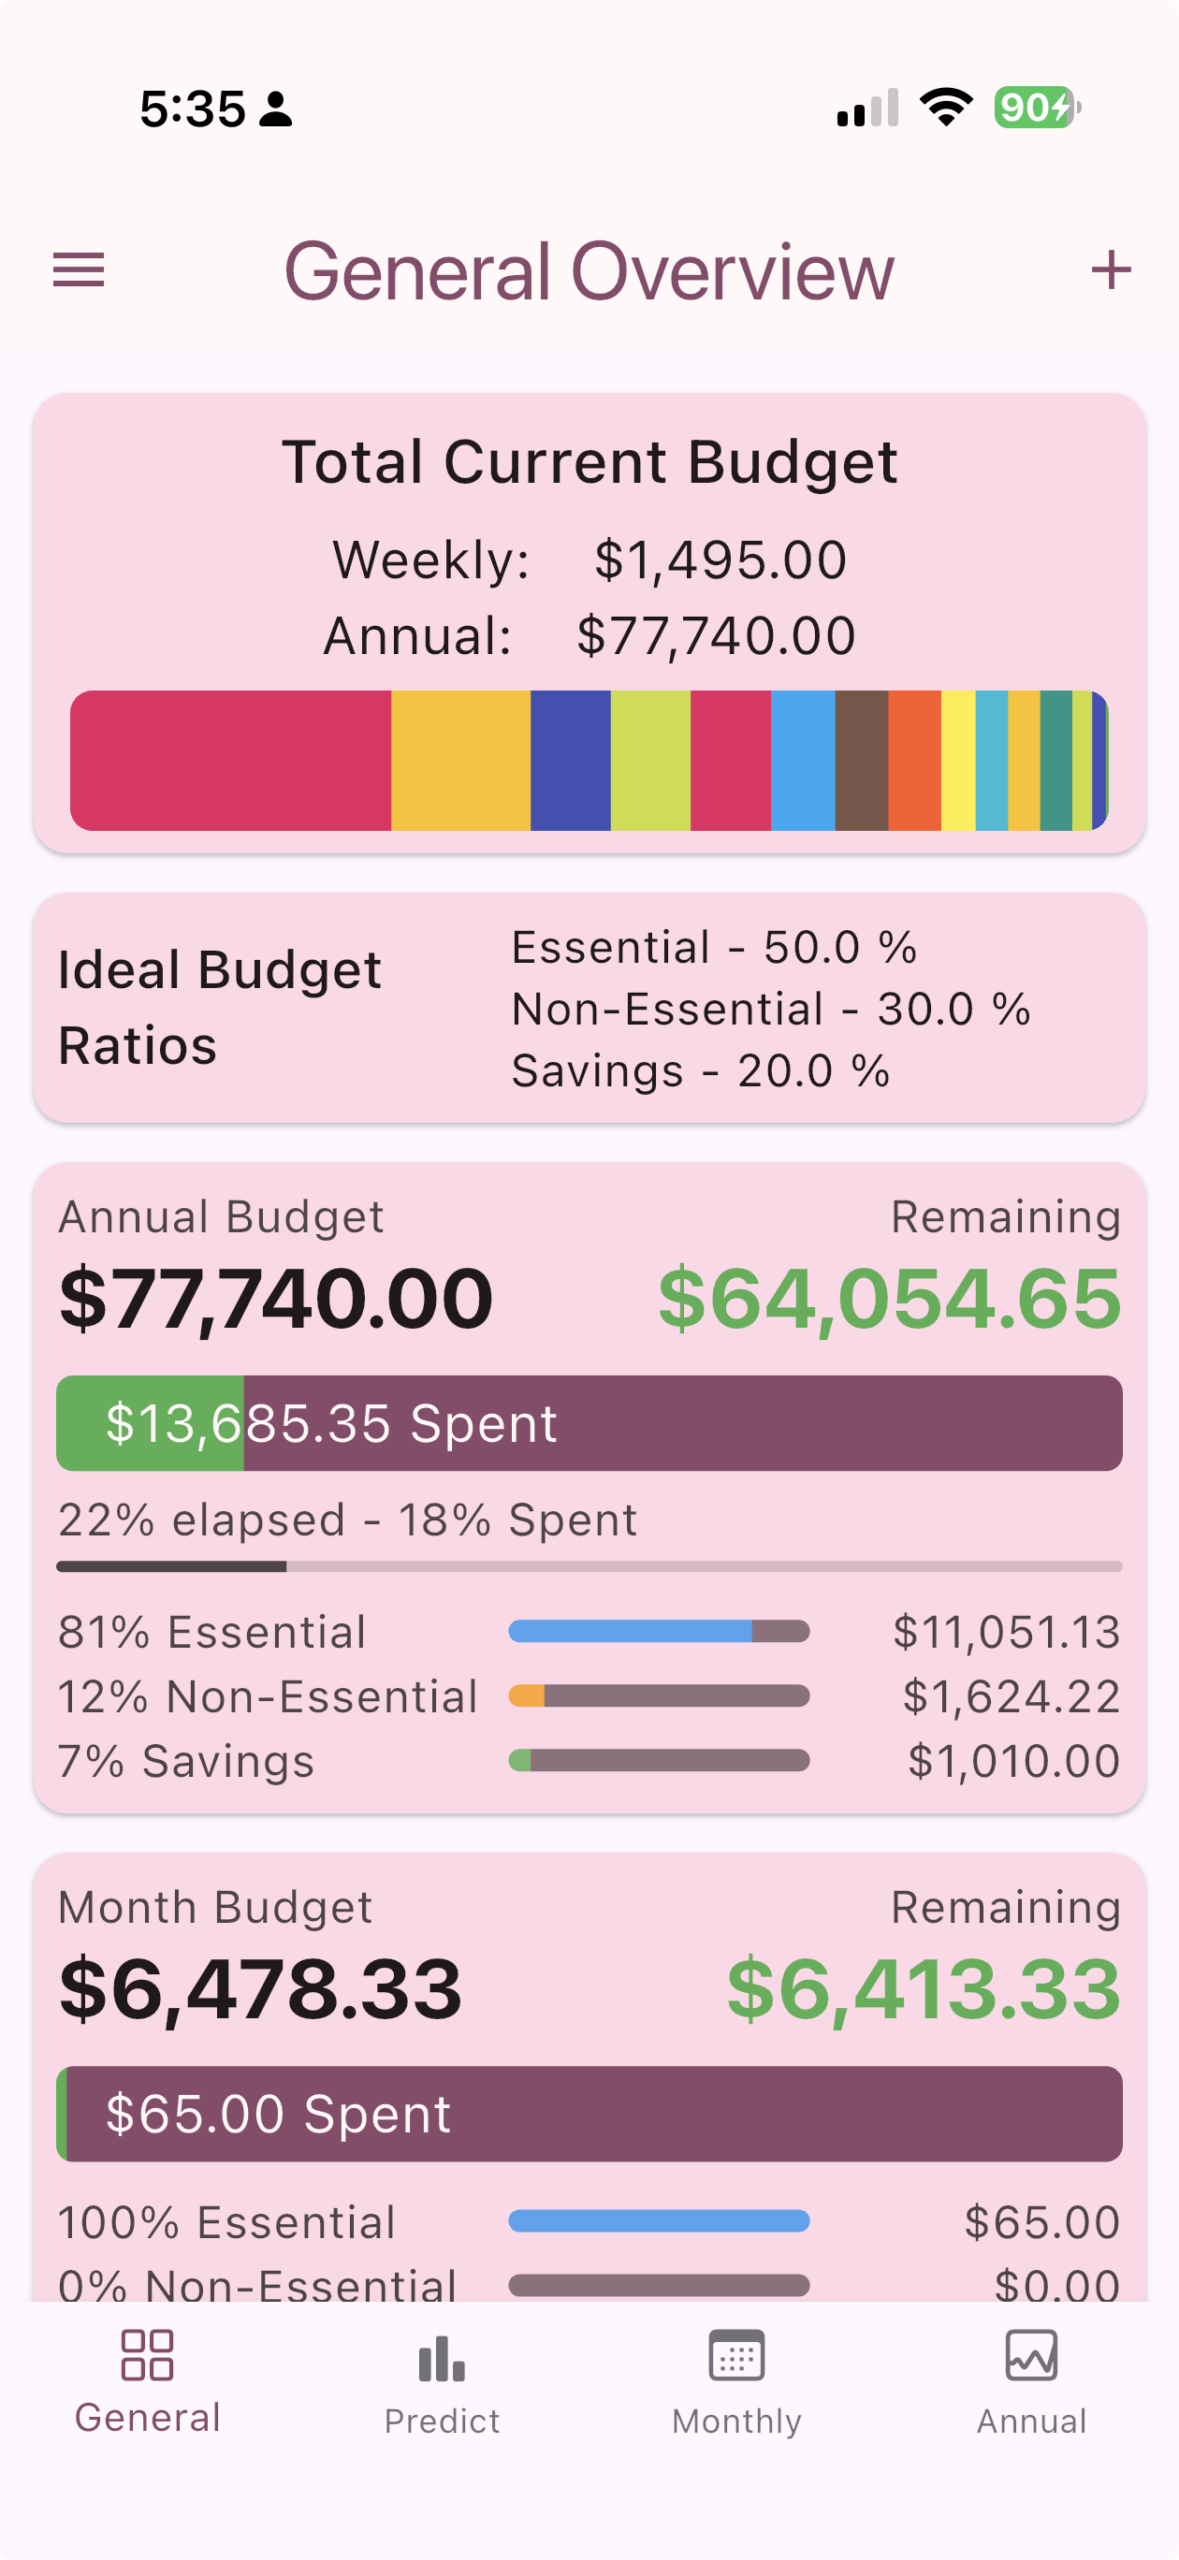
This is the main screen for the app. It gives you an overview of your figures.
Total Current Budget: This is a representation of your annual and weekly budget. Tapping on this will take you to the Categories screen if you want to make any adjustments.
Ideal Budget Ratios: This simply shows you the selection you made in the settings screen as to how much of your budget should go to Essential expenses, versus Non-essential, versus Savings. Tapping on this will take you to the Settings screen.
Annual Budget: This widget shows you your annual budget, how much you've spent so far, and how much is remaining. You can compare this to the percentage of time elapsed in the year to easily see whether or not you're on track. This widget also shows you how much you've spent in the different allocations versus how much you're aiming to spend in them. Tapping on the widget will take you to all a filtered view of the Expenses screen showing expenses for the year to date (starting at your selected month).
Month Budget: This widget is the same as the annual widget except that it's for the current month rather than the year. Tapping on the widget will take you to all a filtered view of the Expenses screen showing expenses for the current month.
Week Budget: This widget is the same as the annual widget except that it's for the current week rather than the year. Tapping on the widget will take you to a filtered view of the Expenses screen showing expenses for the current week.
Tapping on the + icon at the top right of the screen will take you to the Add Expense screen.
Predict(ion)
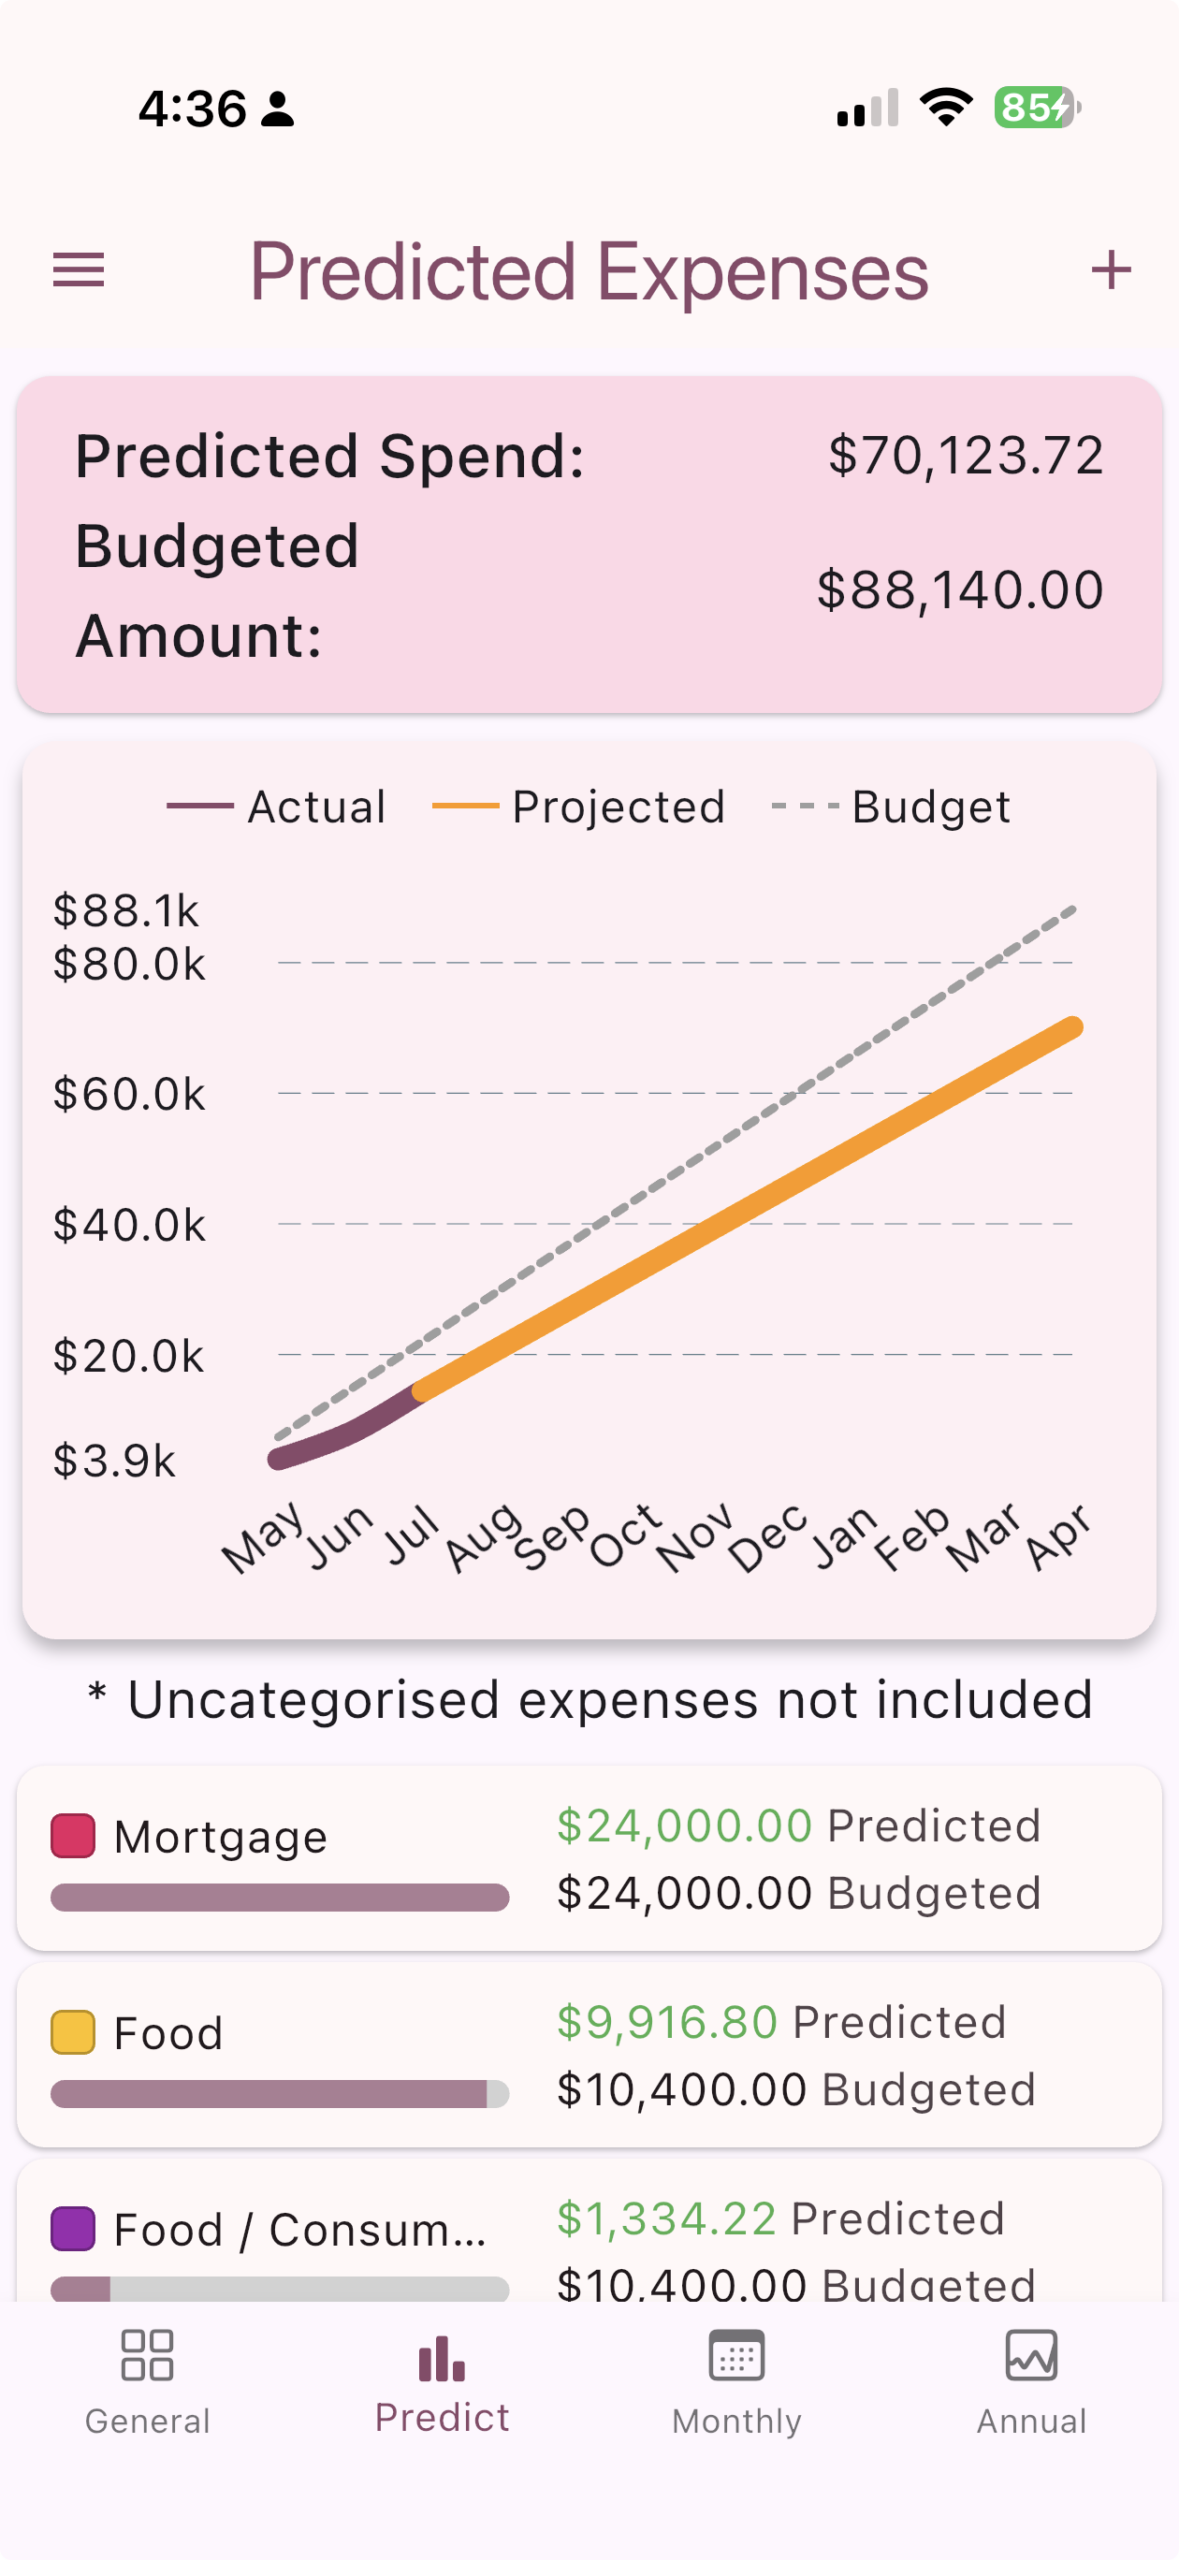
This page uses some magic fairy dust to predict how much you'll spend over the course of the year (starting at whatever month you've selected in the Settings menu).
You can tap on the category boxes below the graph to see a filtered view of the Expenses screen showing expenses within that category for the current year.
Tapping on the + icon at the top right of the screen will take you to the Add Expense screen.
Monthly
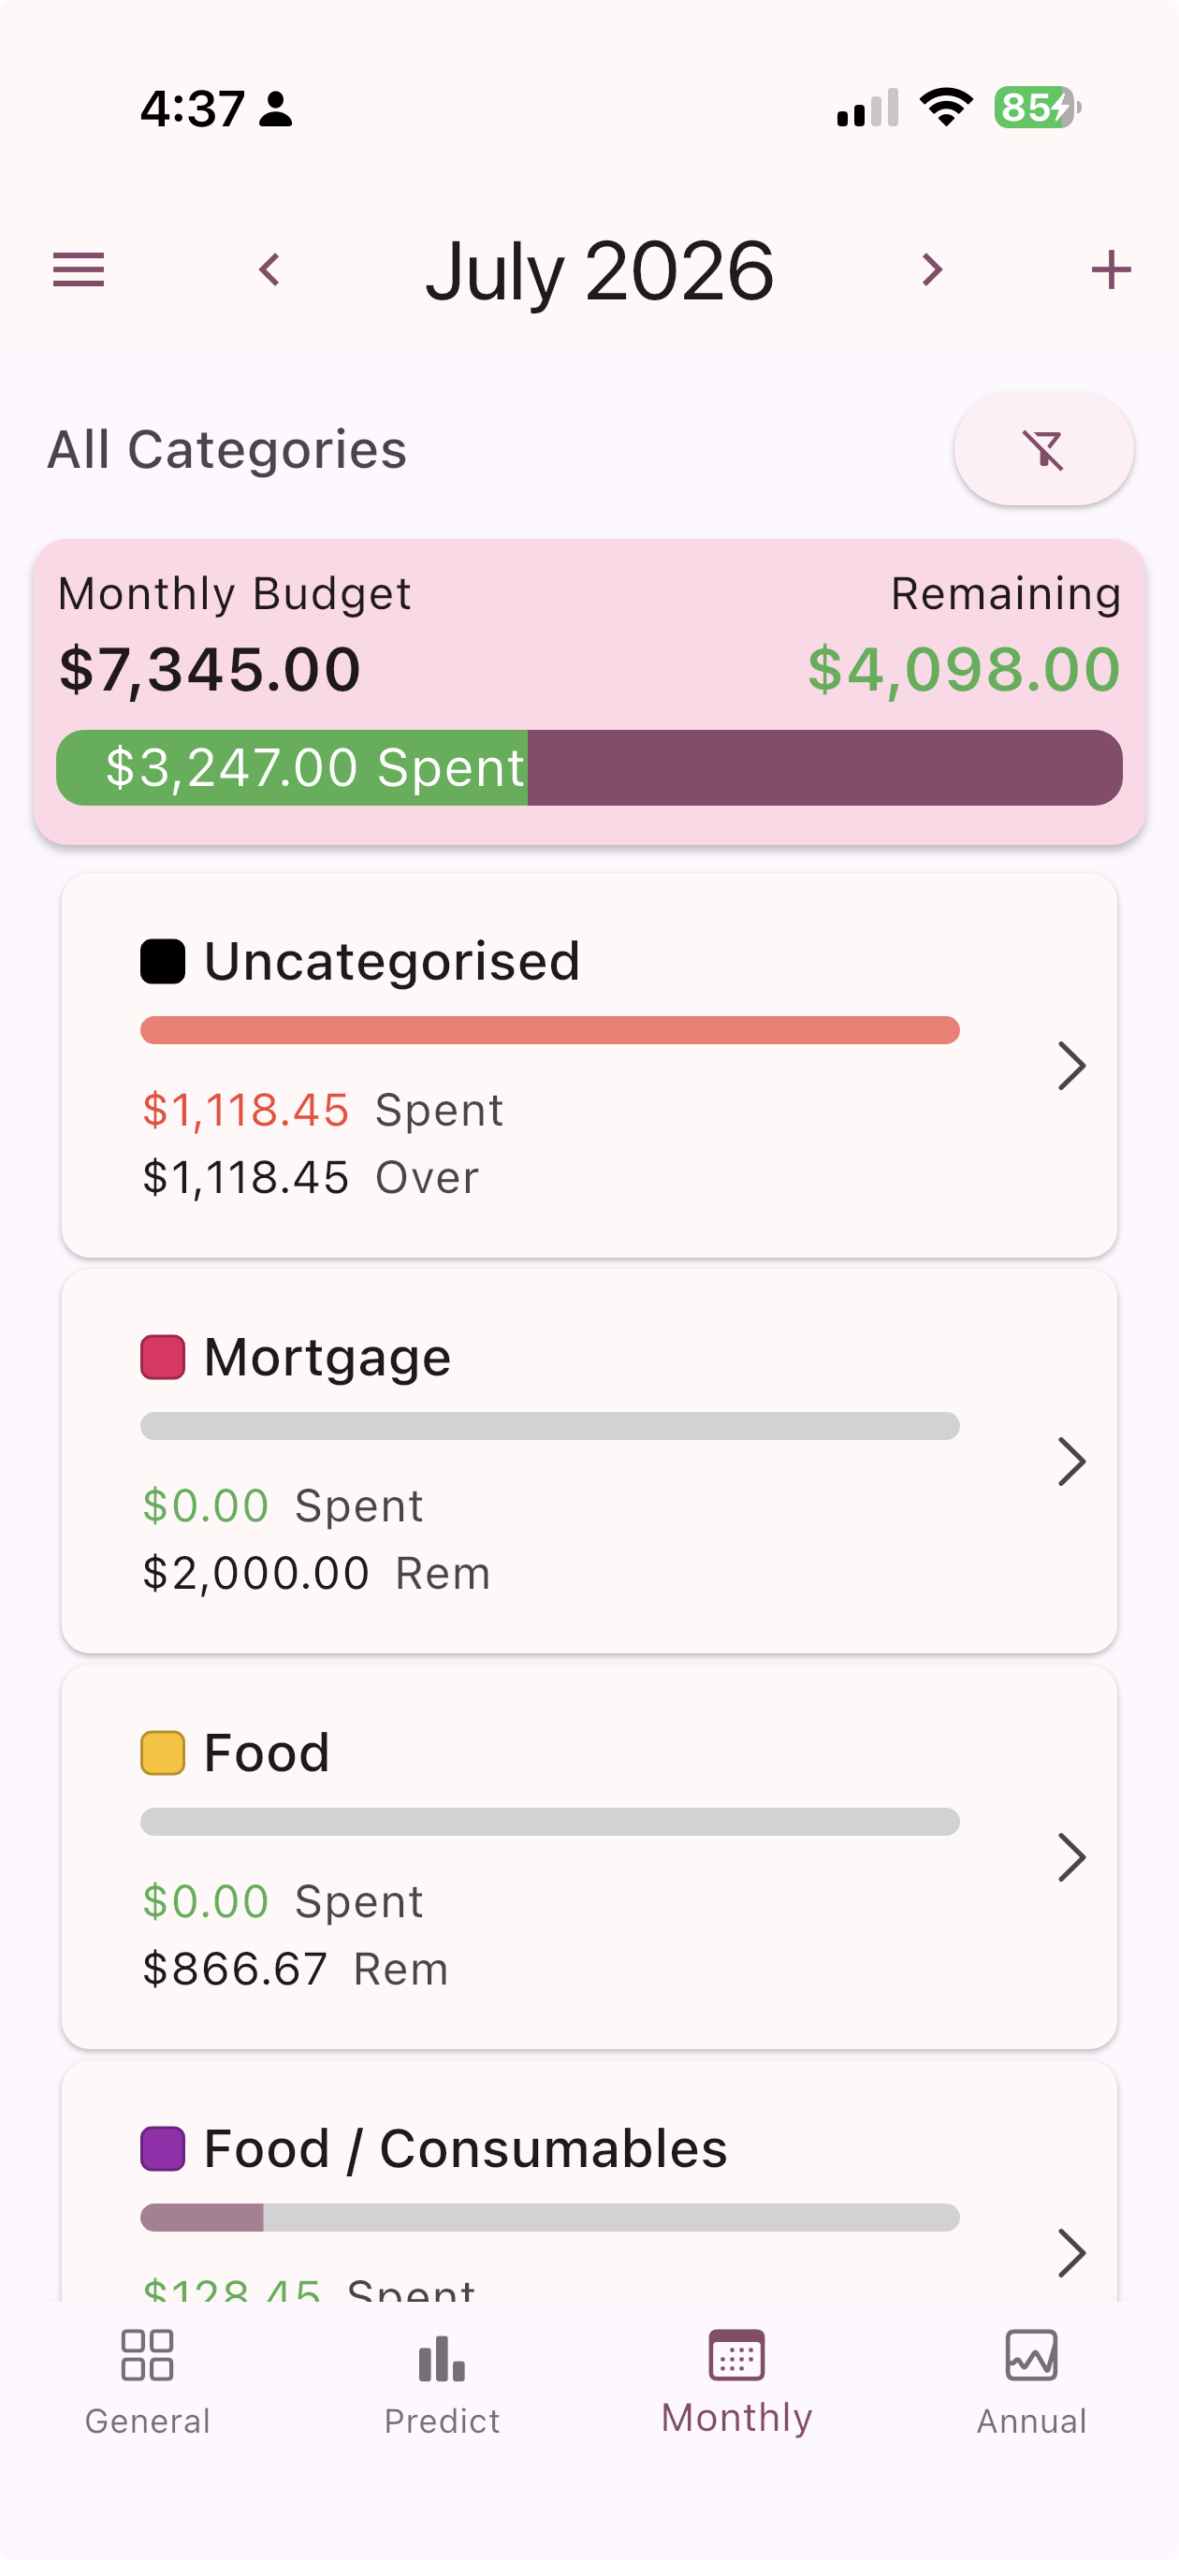
This screen shows you the monthly amount spent in your categories as well as a summary for the month.
You can filter to only those categories that have a cycle of monthly by tapping the filter button.
You can navigate to future and previous months via the arrows at the top of the screen beside the month name. Tapping on the month once you're in a different month will bring you back to the current month.
Tapping on the + icon at the top of the screen will take you to the Add Expense screen.
Annual
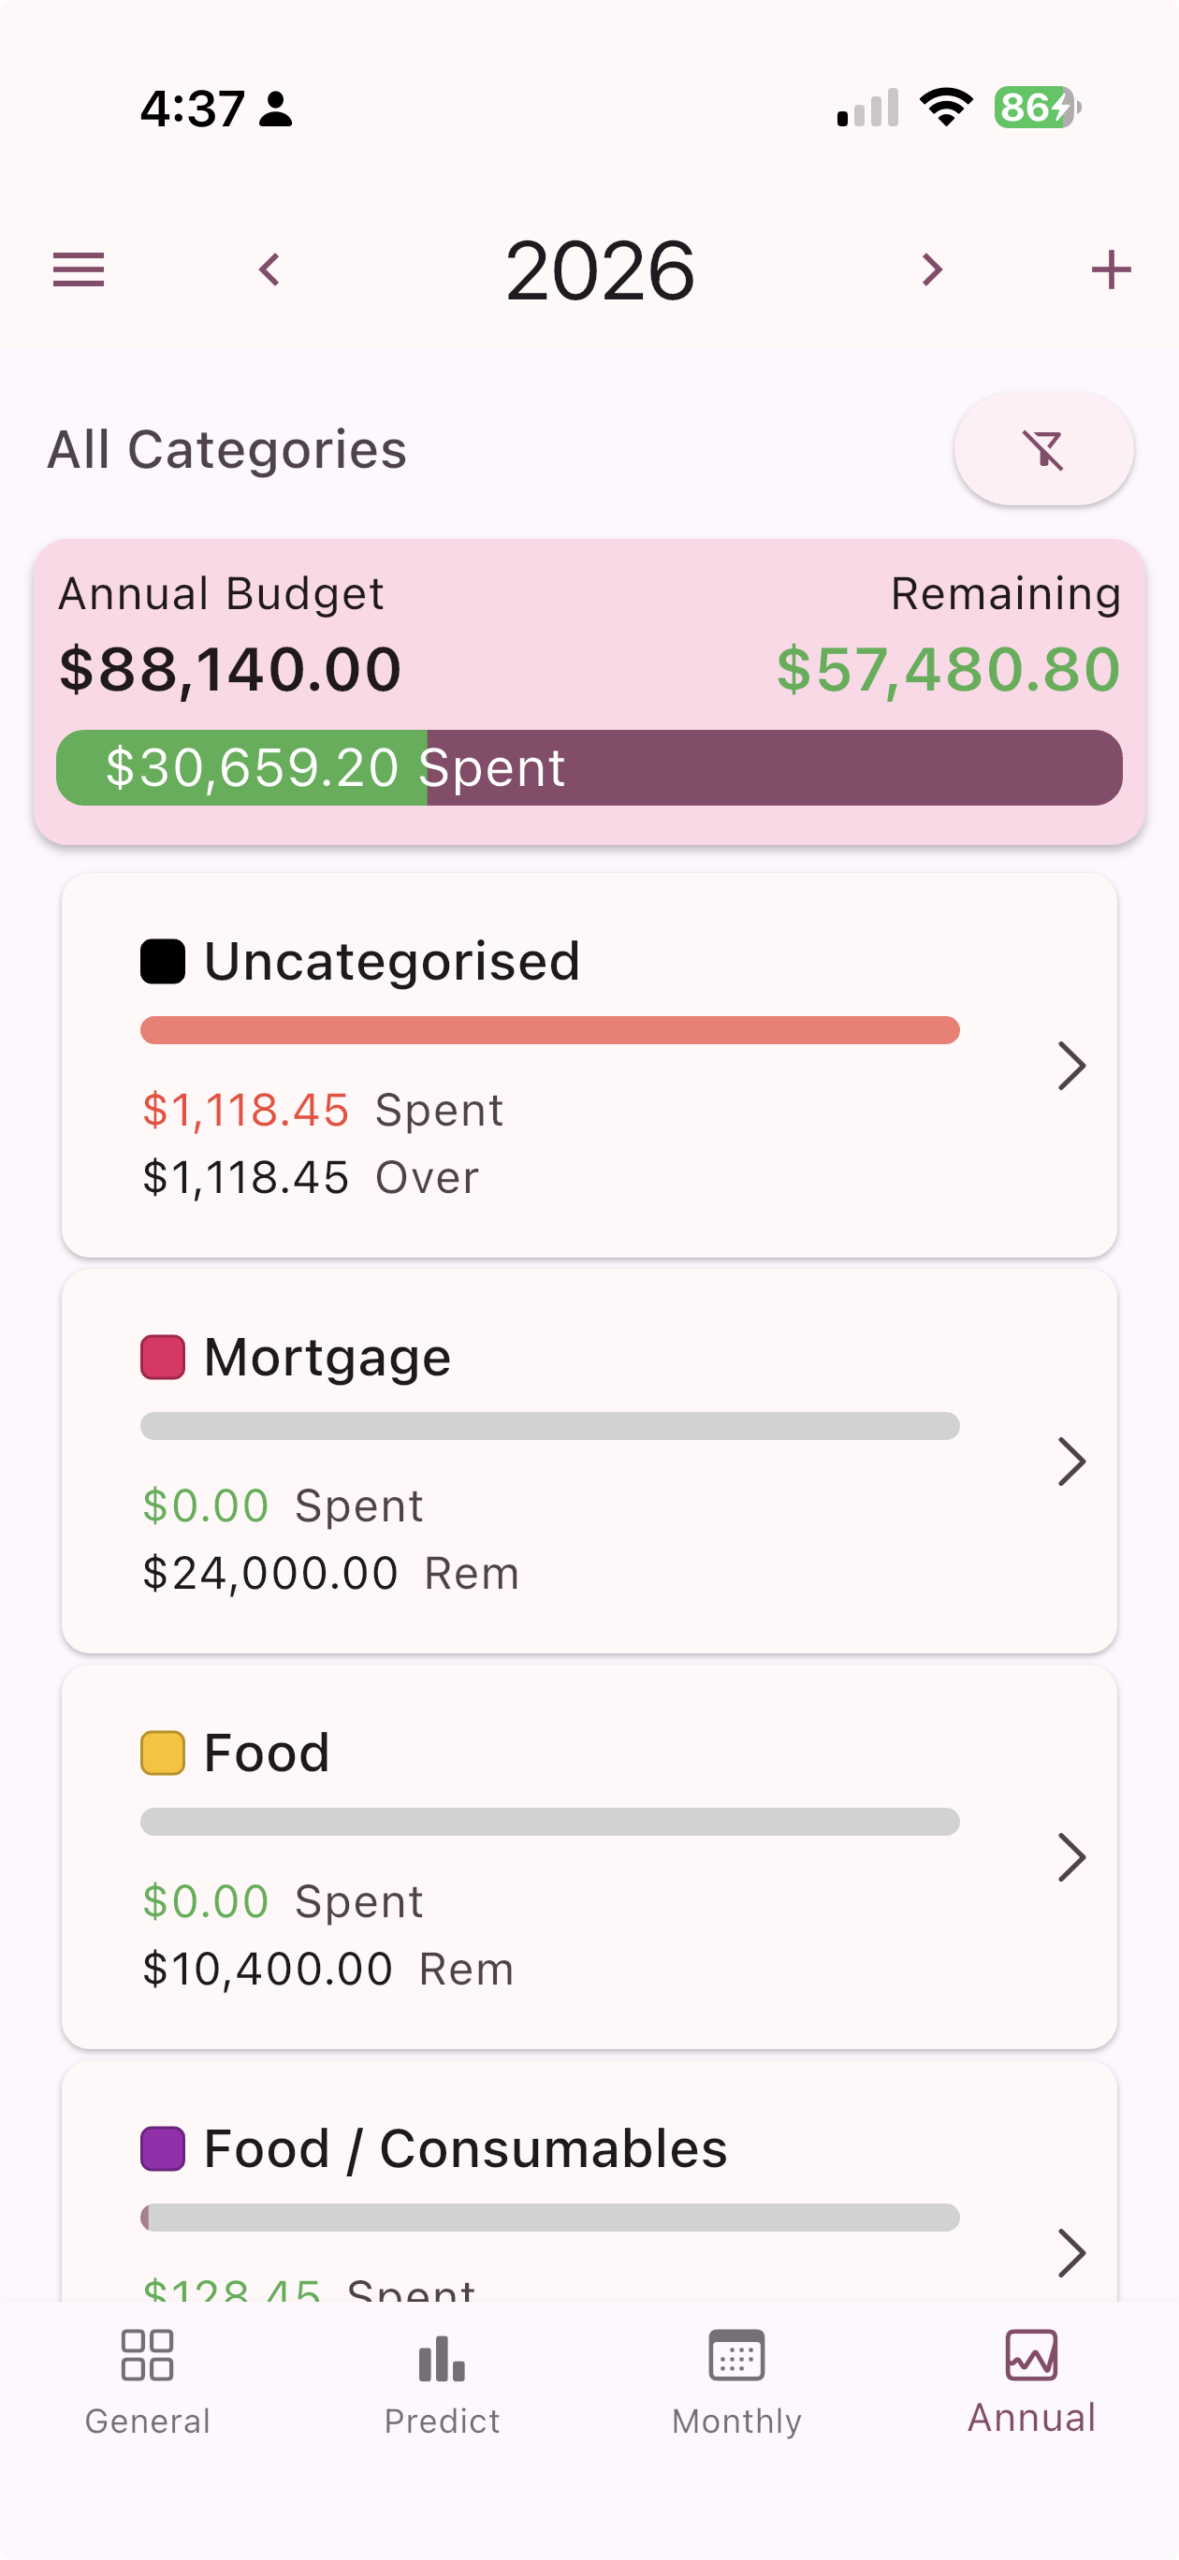
This screens how you the annual amount spent in your categories as well as a summary for the year.
You can navigate to future and previous years via the arrow at the top of the screen beside the year. Tapping on the year once you're in a different year will bring you back to the current year.
You can filter to only those categories that have a cycle of yearly by tapping the filter button.
Tapping on the + icon at the top of the screen will take you to the Add Expense screen.
Side Menu Options
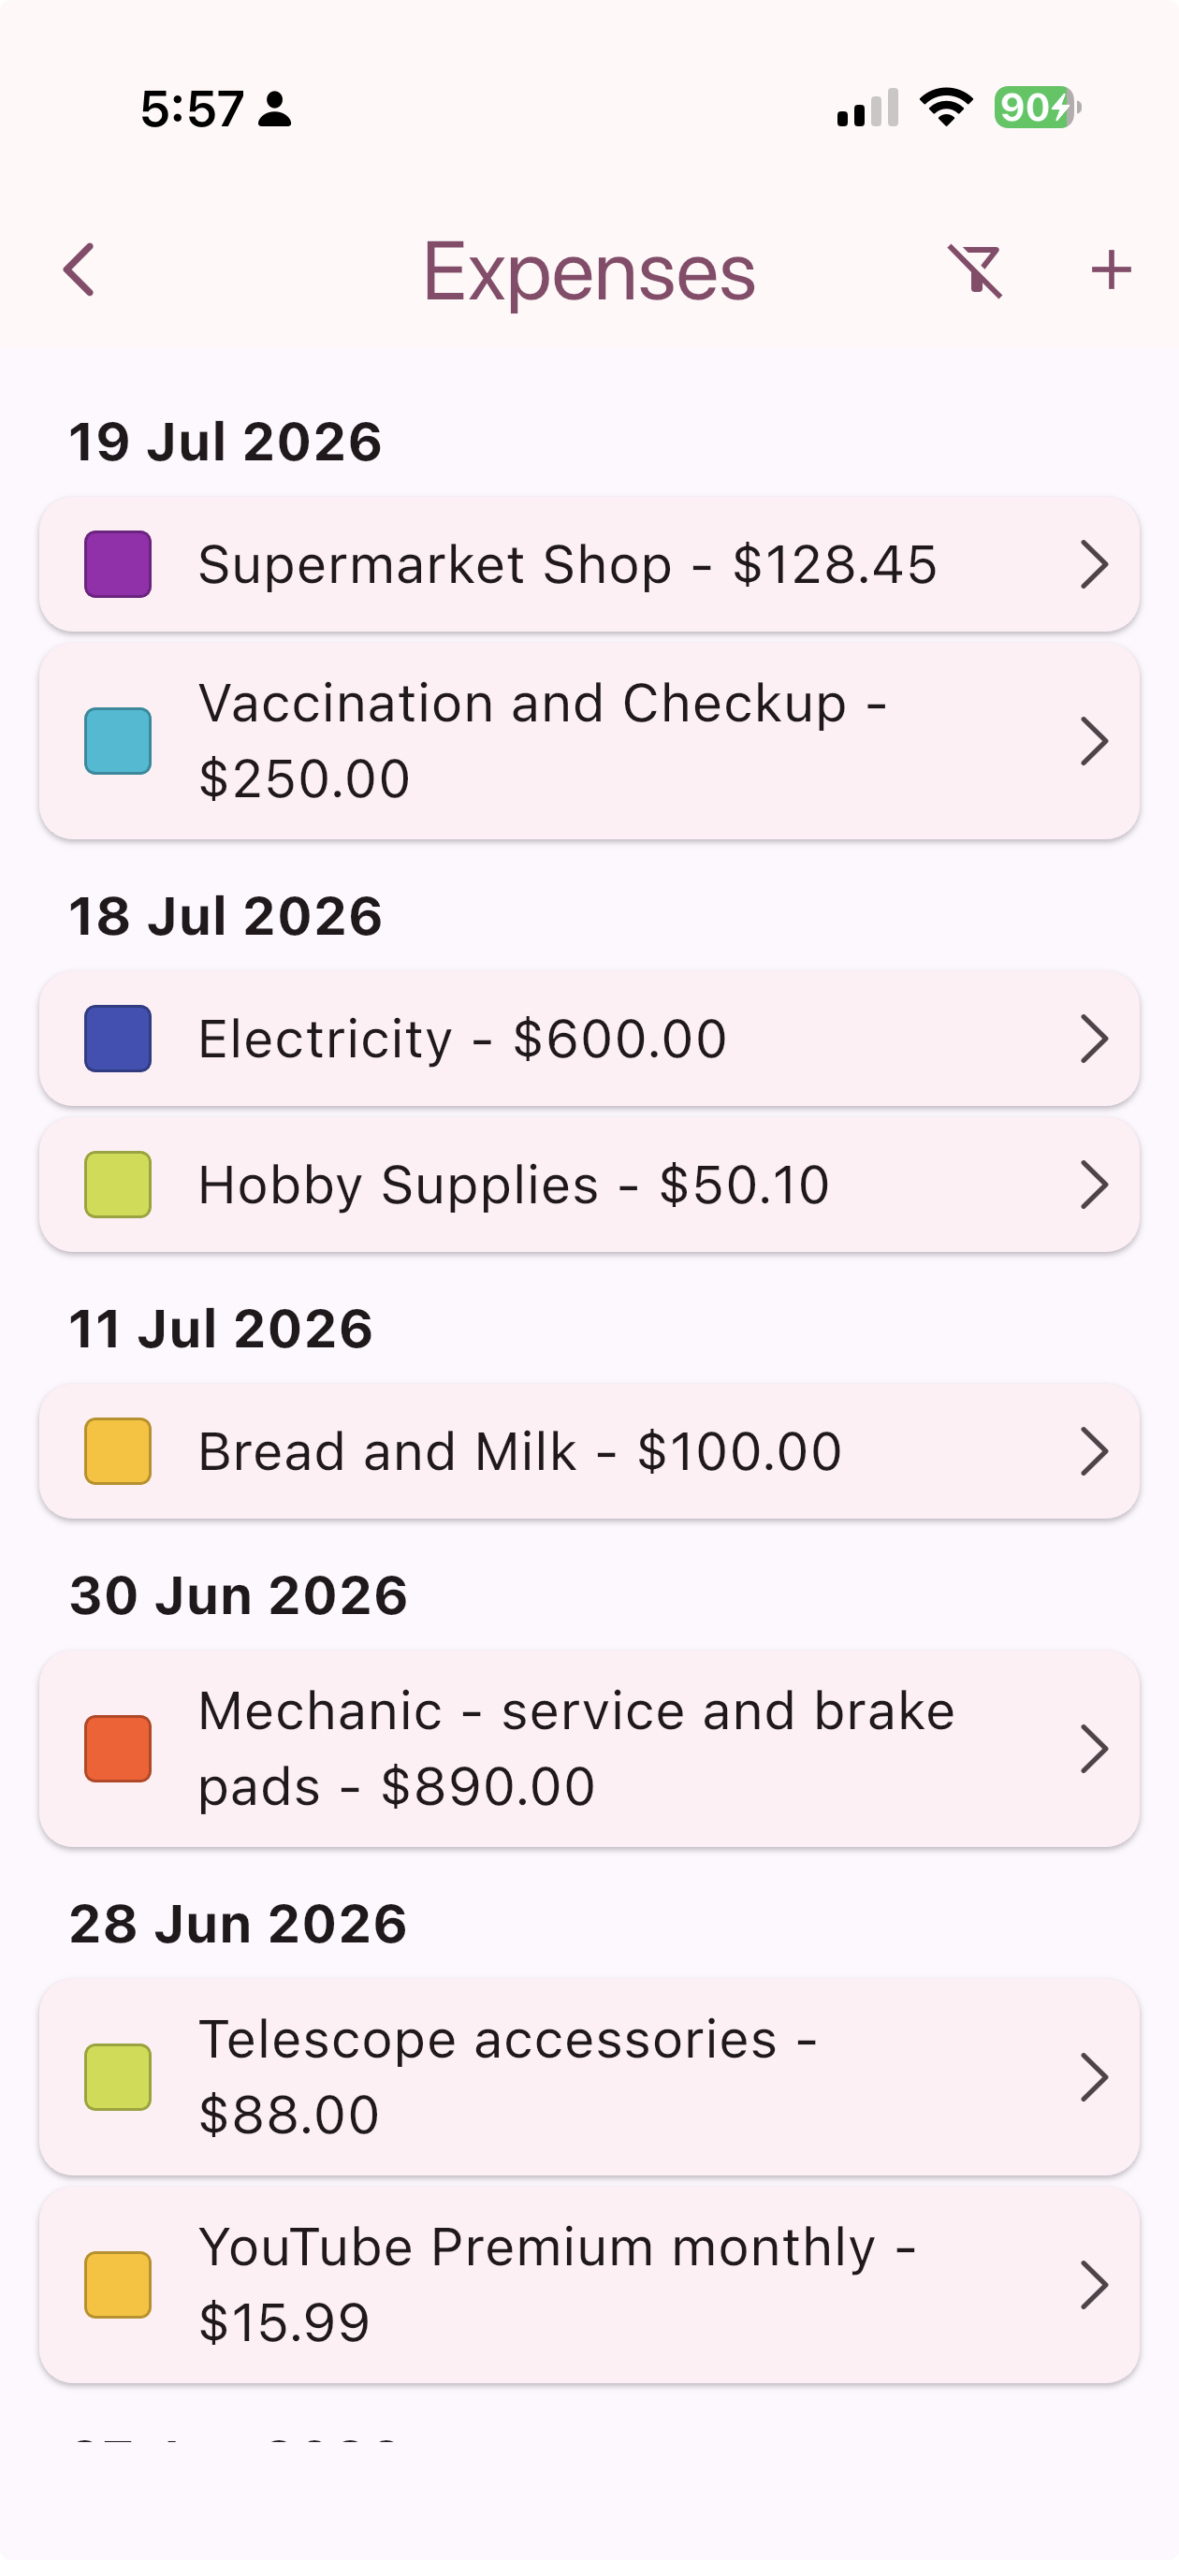
Expenses
Expenses are anything that you purchase or put away into a savings account. Because Watch My Wallet doesn't use accounts, some entries in your bank statement (if you're uploading a CSV) don't need to be entered here, such as transfers between accounts.
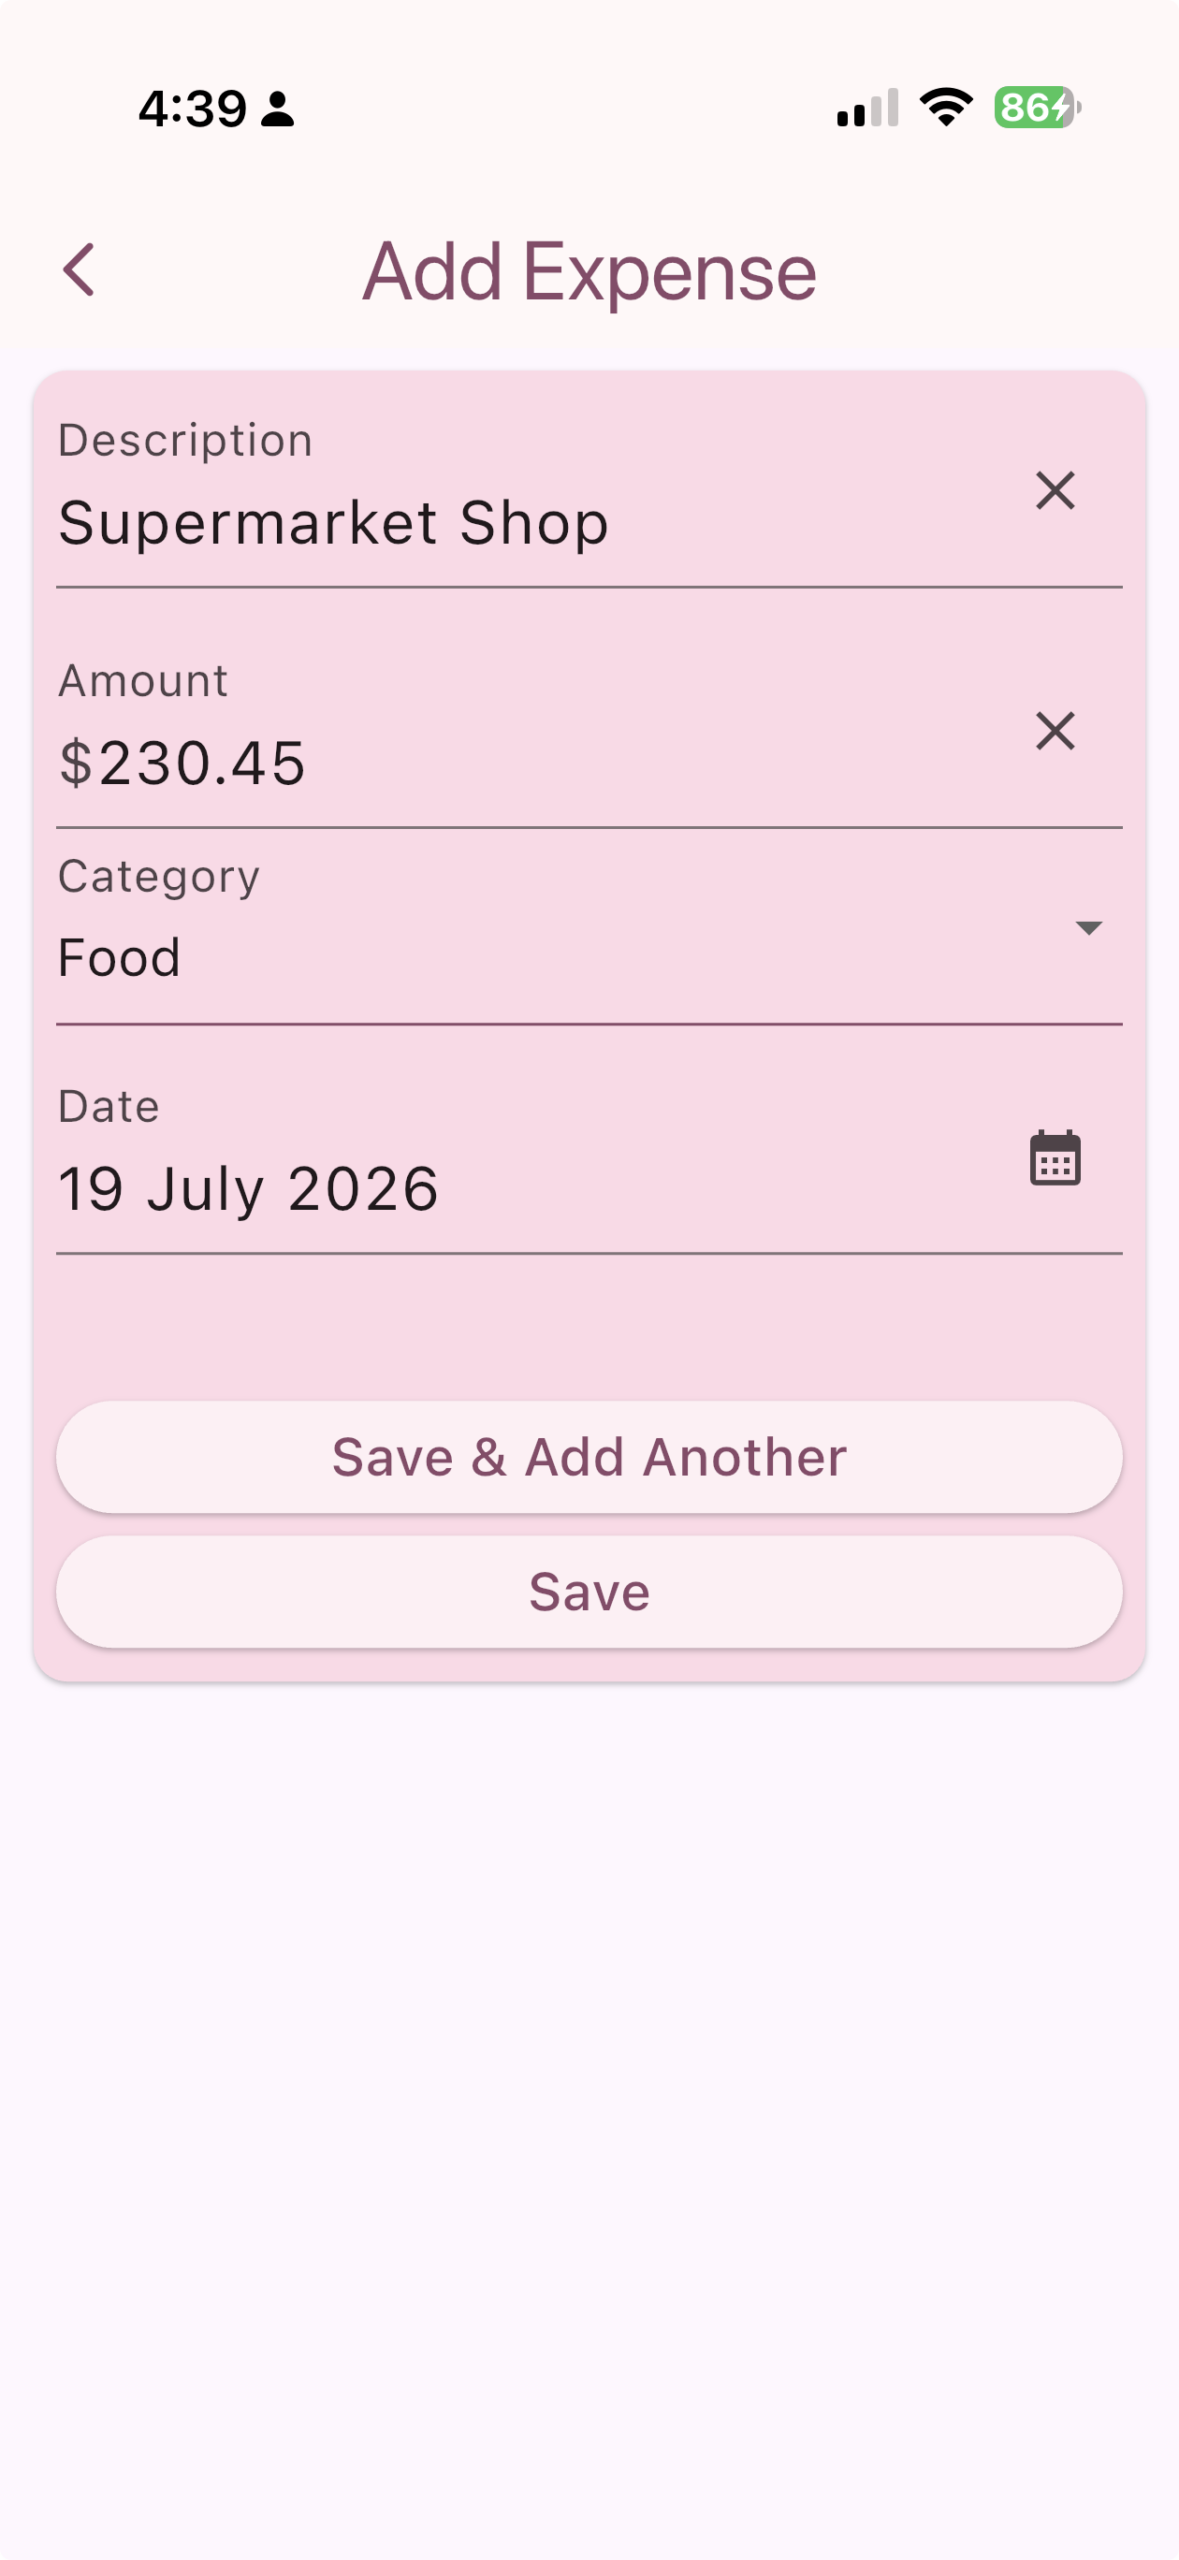
To add a new expense, tap the + icon at the top right of the Expenses Screen or the + icon at the top right of any of the Main Screens (such as the General screen). You'll be taken to the Add Expense screen. Enter the details for the expense. This will include description, amount, category and date.
Description: If you're purchasing groceries you might enter something like 'Supermarket - Groceries'.
Amount: The amount you spent.
Category: The category for this expense. e.g. Food for a supermarket expense. If you don't have any Categories yet, please see the Categories section below. Categories will be shown in a dropdown.
Date: The date you made the purchase.
To delete an expense, swipe on the Expense box and confirm you want to remove the expense.
To edit an expense, simply tap on the Expense box and you'll be take to the Edit Expense screen.
You can also filter expenses by: Description, Category, a minimum amount or date range by tapping on the filter icon next to the + icon at the top of the screen.
Note: By default there is an 'Uncategorised' category for expenses. Expenses using this category will be highlighted on the General screen as they have not yet been assigned and it is advisable to do so. The prediction graph for example will only look at expenses that have been categorised.
Categories
Categories are a way for you to divide your budget into trackable groups. The idea is to create categories until your full income is accounted for. This can include all kinds of groups such as food, clothing, school, rent/mortgage etc. You can also create a category for savings.
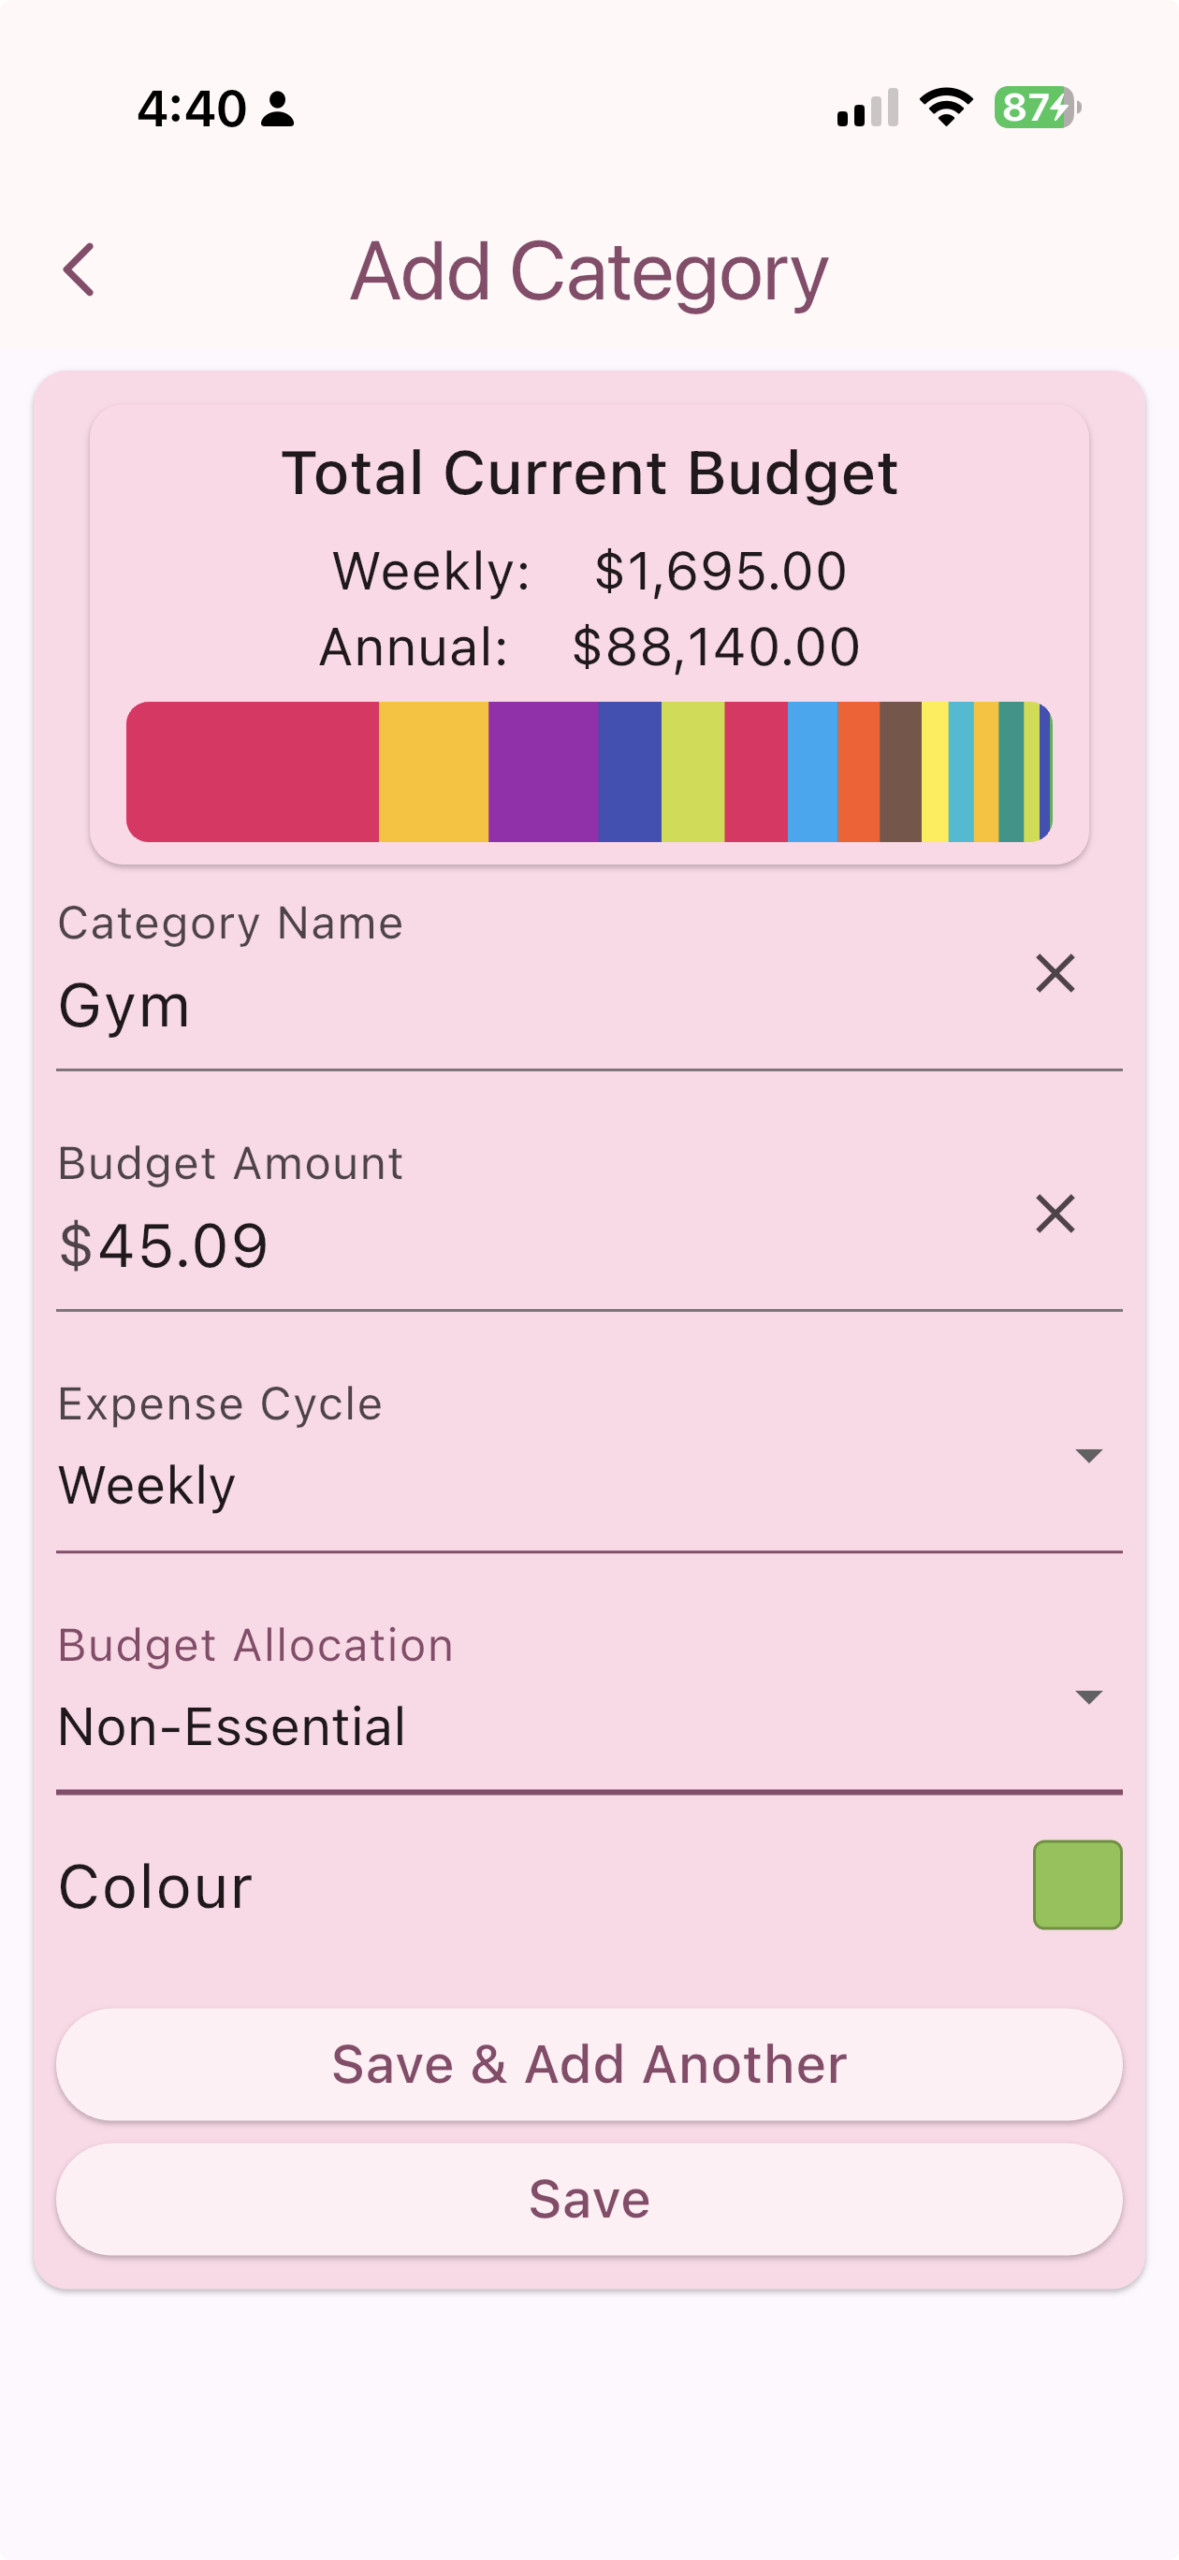
To add a new category, tap the + icon at the top right of the Categories screen and you'll be taken to the Add Category screen. Enter the details for your new category. This will include name, budget amount, cycle, budget allocation and colour.
Category Name: The name of the category e.g. 'Food'
Budget Amount: The amount you think you should allocate for this category for a selected cycle. e.g. $200 (per week)
Expense Cycle: The period this amount will be spent in e.g. Weekly for this food example.
Budget Allocation: Is this an essential expense, yes in this case! Other options are Non-essential and Savings.
Colour: It can be nice to set different colours for the different categories so you can see at a glance what you are spending the most on. Tap on the coloured box to change the colour.
Tap the 'Save' or 'Save & Add Another' to save this expense and optionally stay on this screen to add another category.
To delete a category, swipe on the Category box and confirm you want to remove the category.
The edit a category, simply tap on the Category Box and you'll be taken to the Edit Category screen.
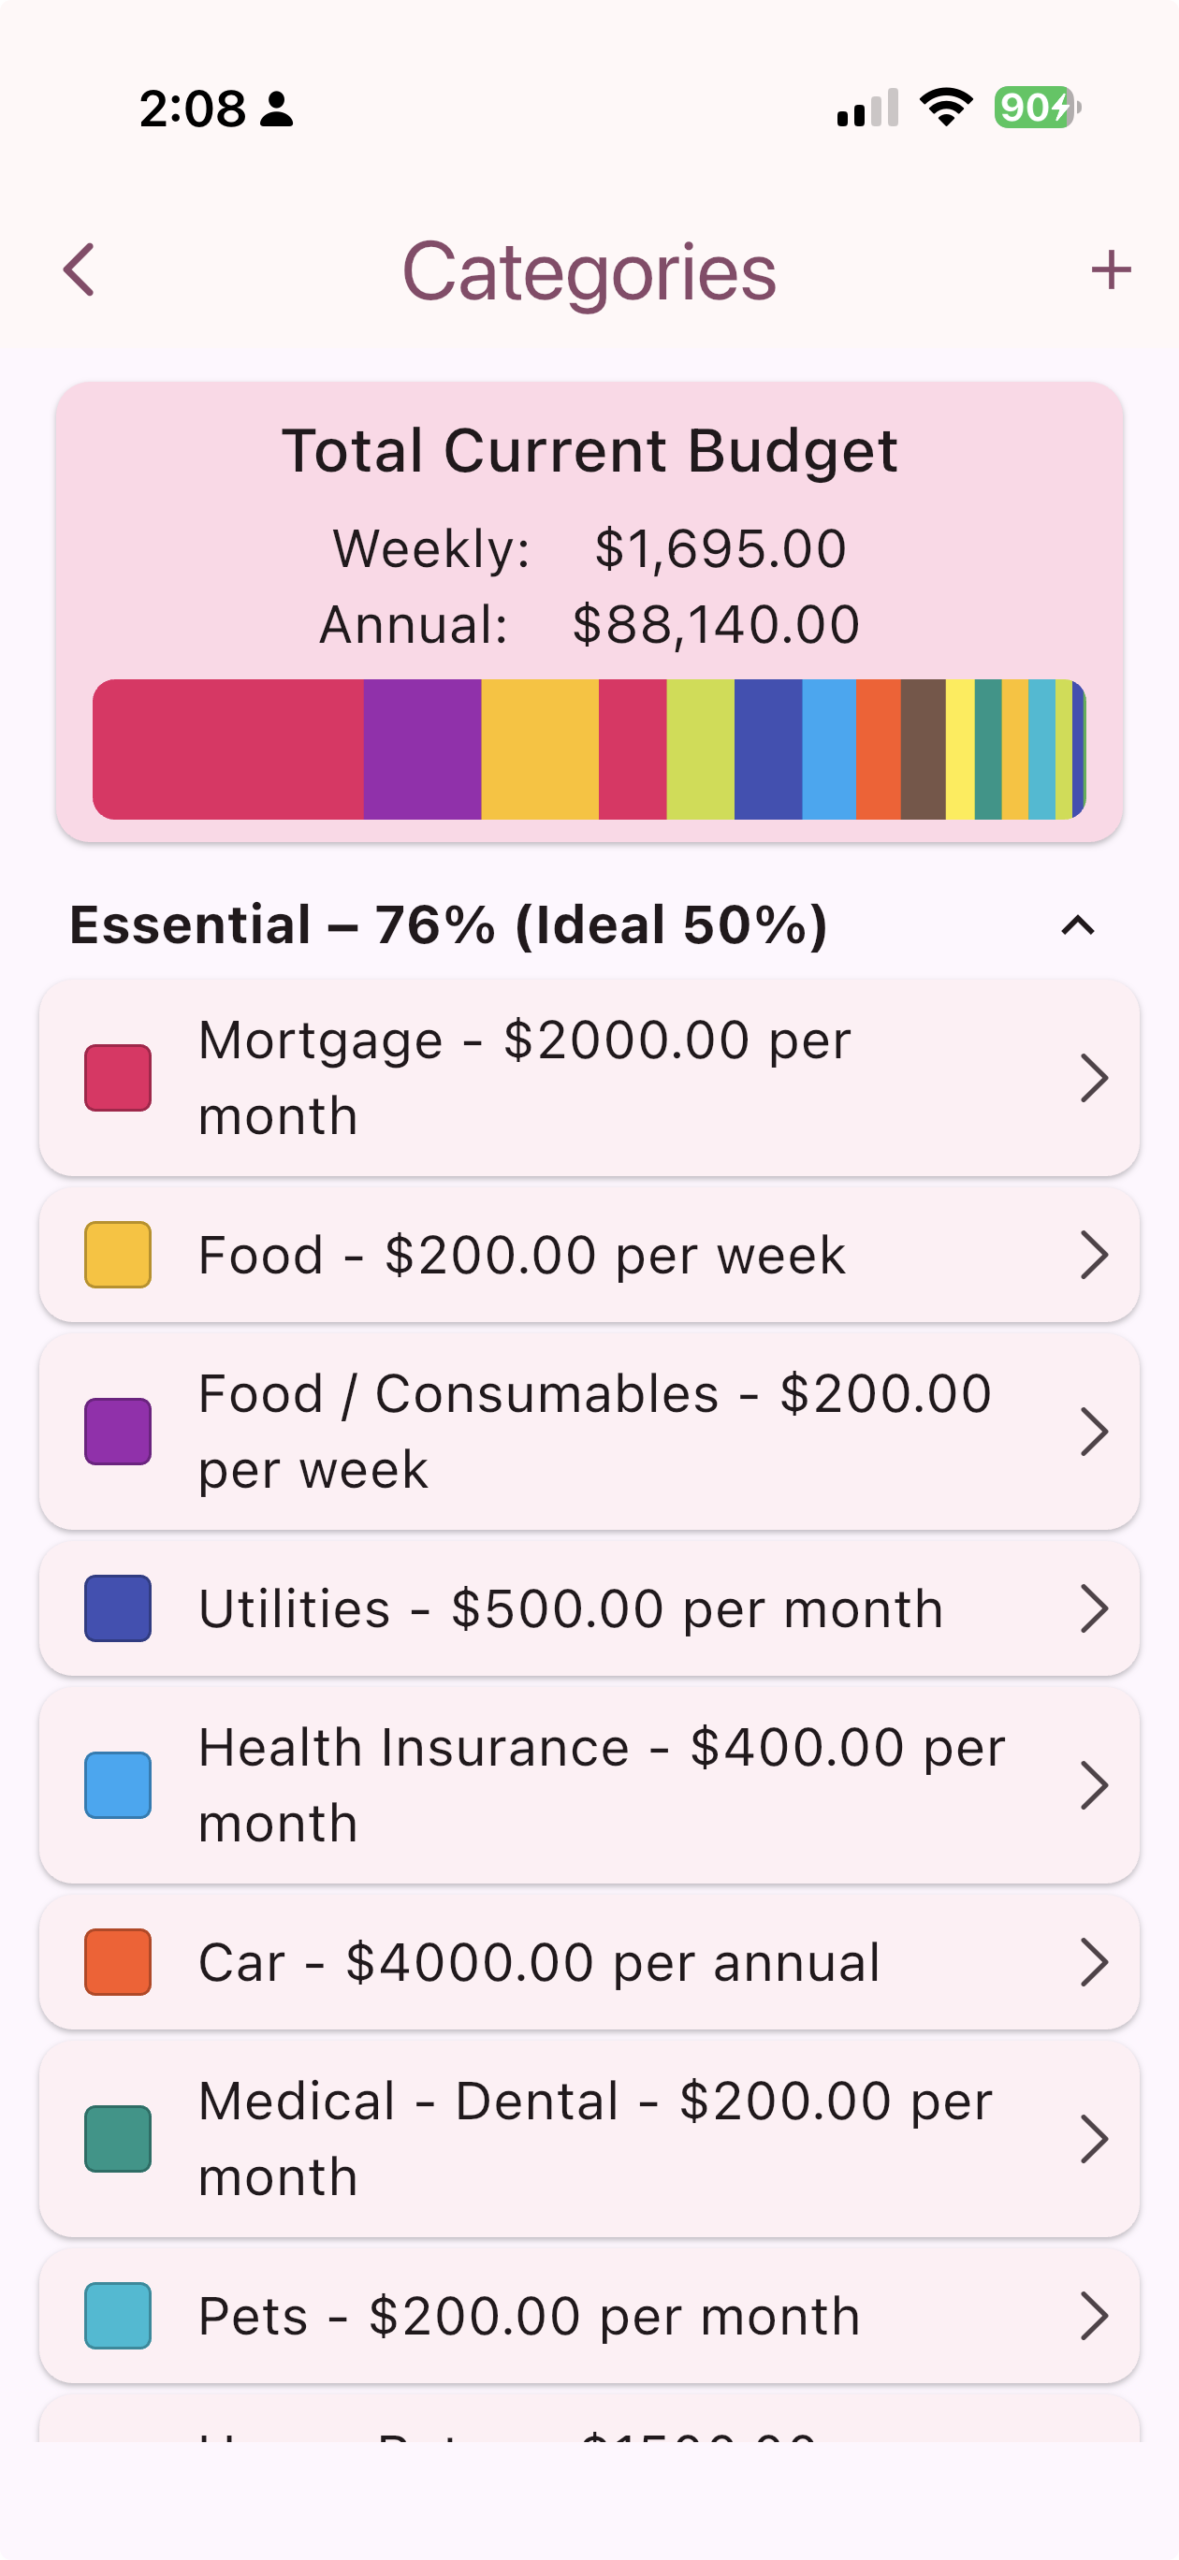
As you add Categories, you'll notice that the amounts per Week and Year are added to the bar at the top of both of the screens shown below. This makes it easy to know how much you have remaining to spend/save and whether or not you need to shuffle your budget a bit to make it fit.
In the Categories screen the categories are ordered by the largest to smallest amount allocated in a year (divided into Essential / Non-essential and Savings).
If you want to change your ideal percentages for Essential, Non-Essential and Savings there are sliders in the Settings screen.
Note: By default there is an 'Uncategorised' category that can't be edited or removed. This is the default place for expenses imported by CSV. Any expenses that fit into this Category will be highlighted on the General screen so that you can easily make sure everything is categorised.
Load Expense CSV
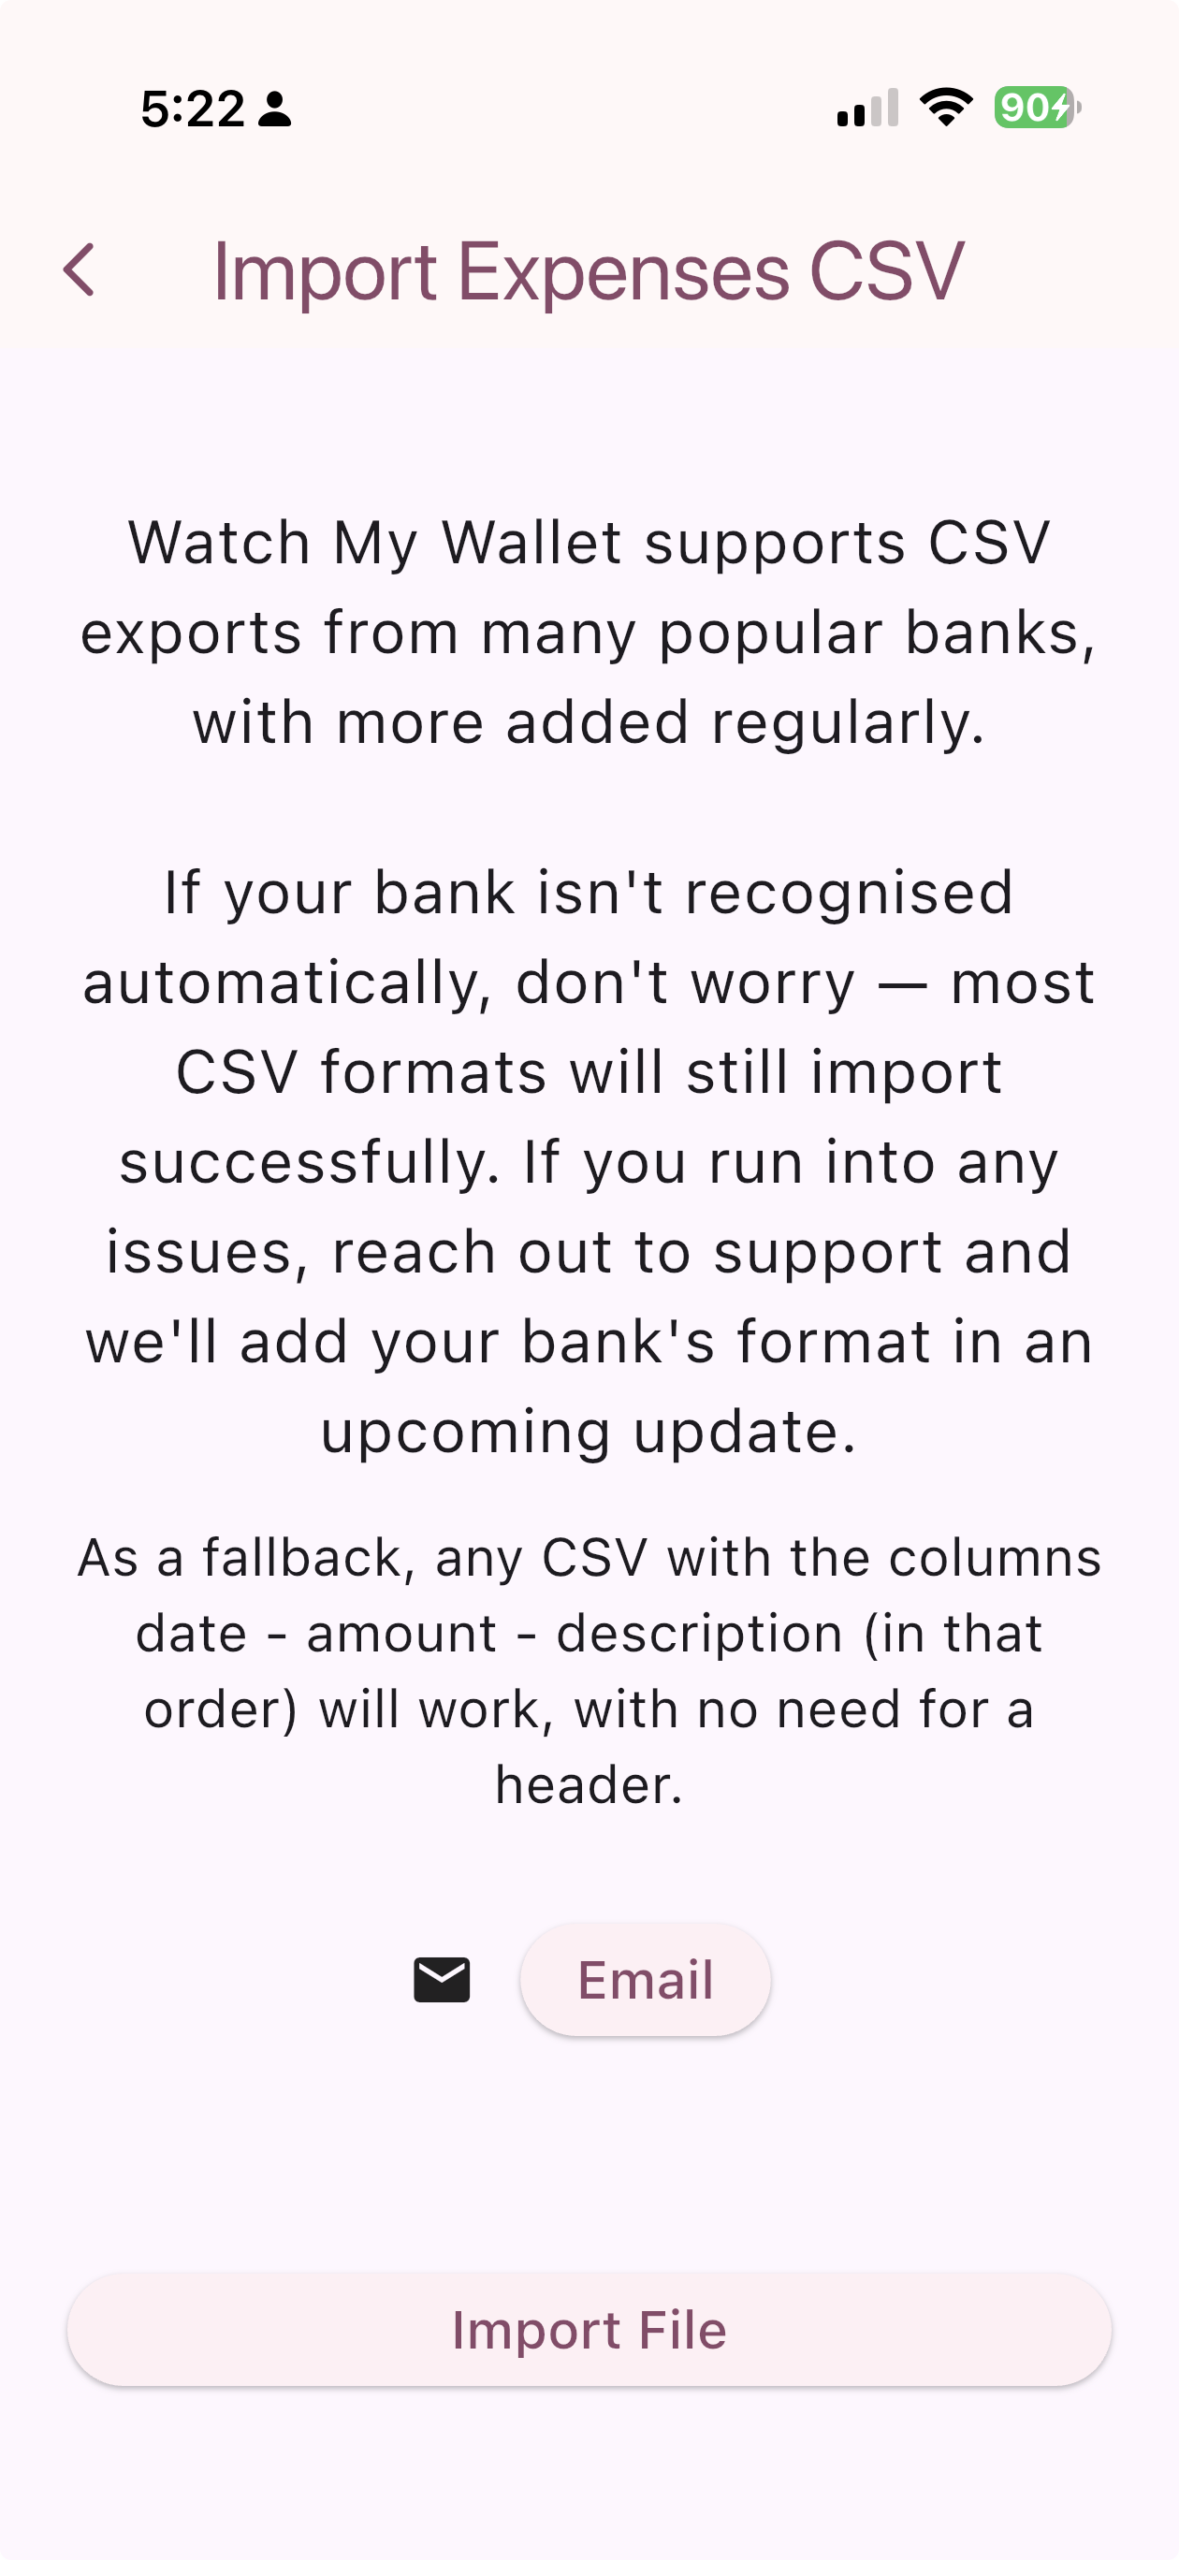
This screen allows you to select a CSV (comma separated values) file to easily import CSVs that you have created or downloaded from your bank. These are plain text files that have a new expense on each line and should be available from your bank website. It's a great way to easily put in a few months of past expenses.
To import these expenses, tap on the 'Import File' button and select a file from your device files or cloud files if these are accessible from your device.
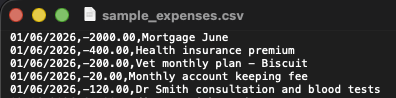
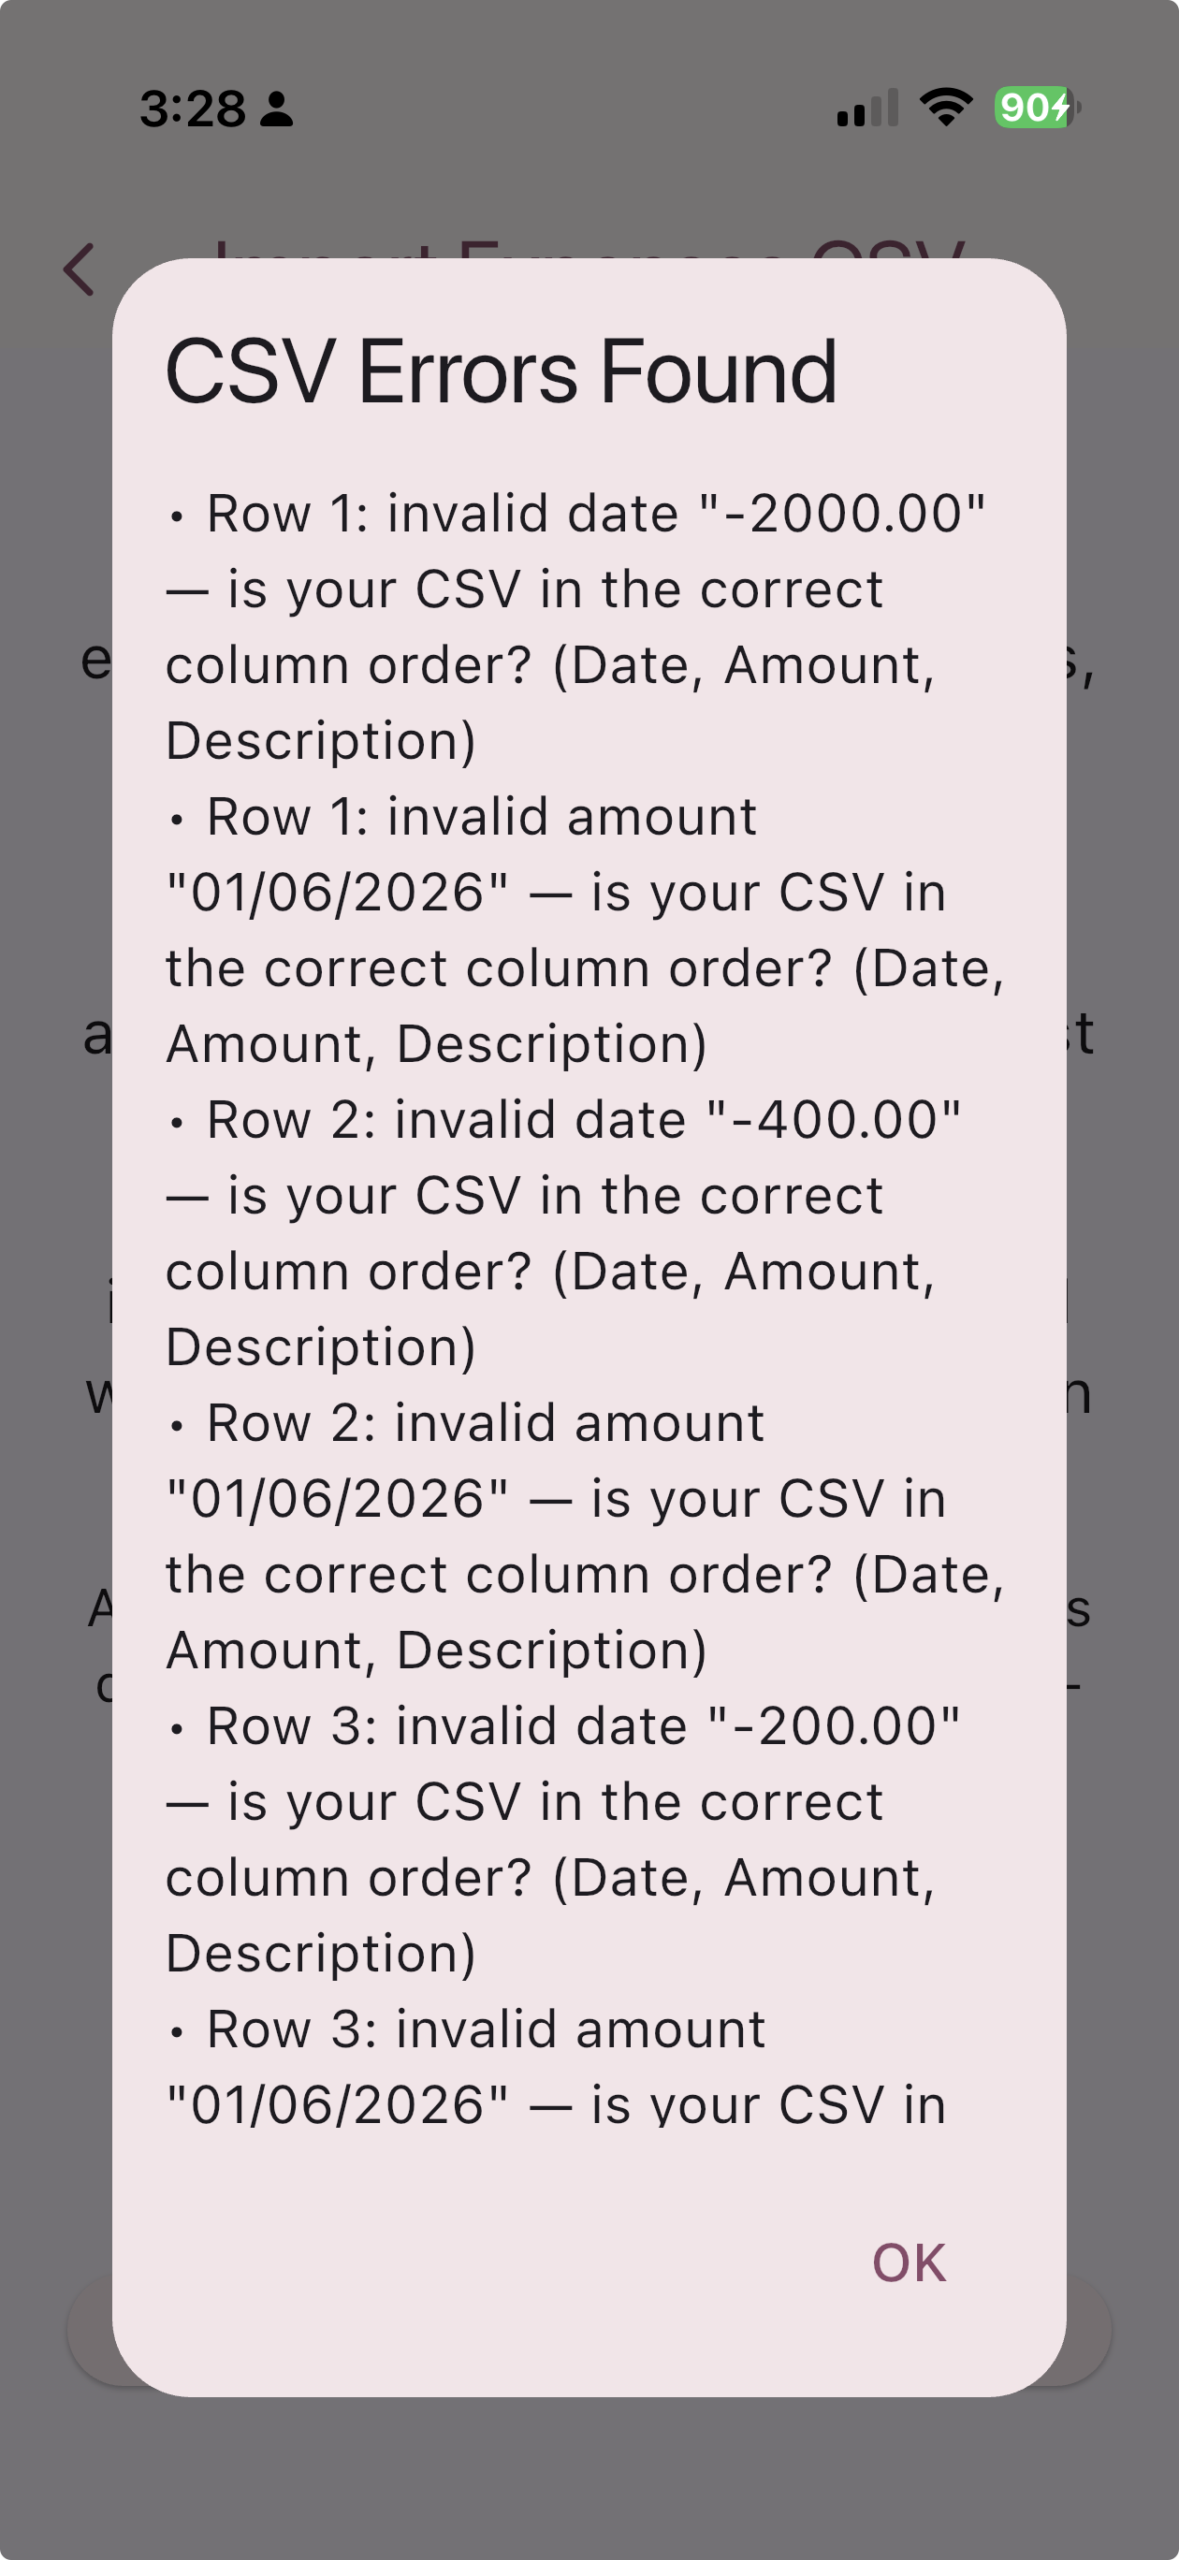
There can be many different formats for these files and although several have been included by default, you may find that you're getting a bunch of errors such as seen in the 'CSV Errors Found' screenshot. If this happens you can do the following.
- Firstly, send support the first few lines of the file (and anonymise any data by changing descriptions/amounts). This way we'll be able to add that format to the app so that next time you'll be able to import the file easily.
- Secondly you can manually edit the file to have 3 columns: date, amount and description. No need for a header row. You can then import this file instead.
Make sure that when you're editing the file you save it as plain text and not rich text!
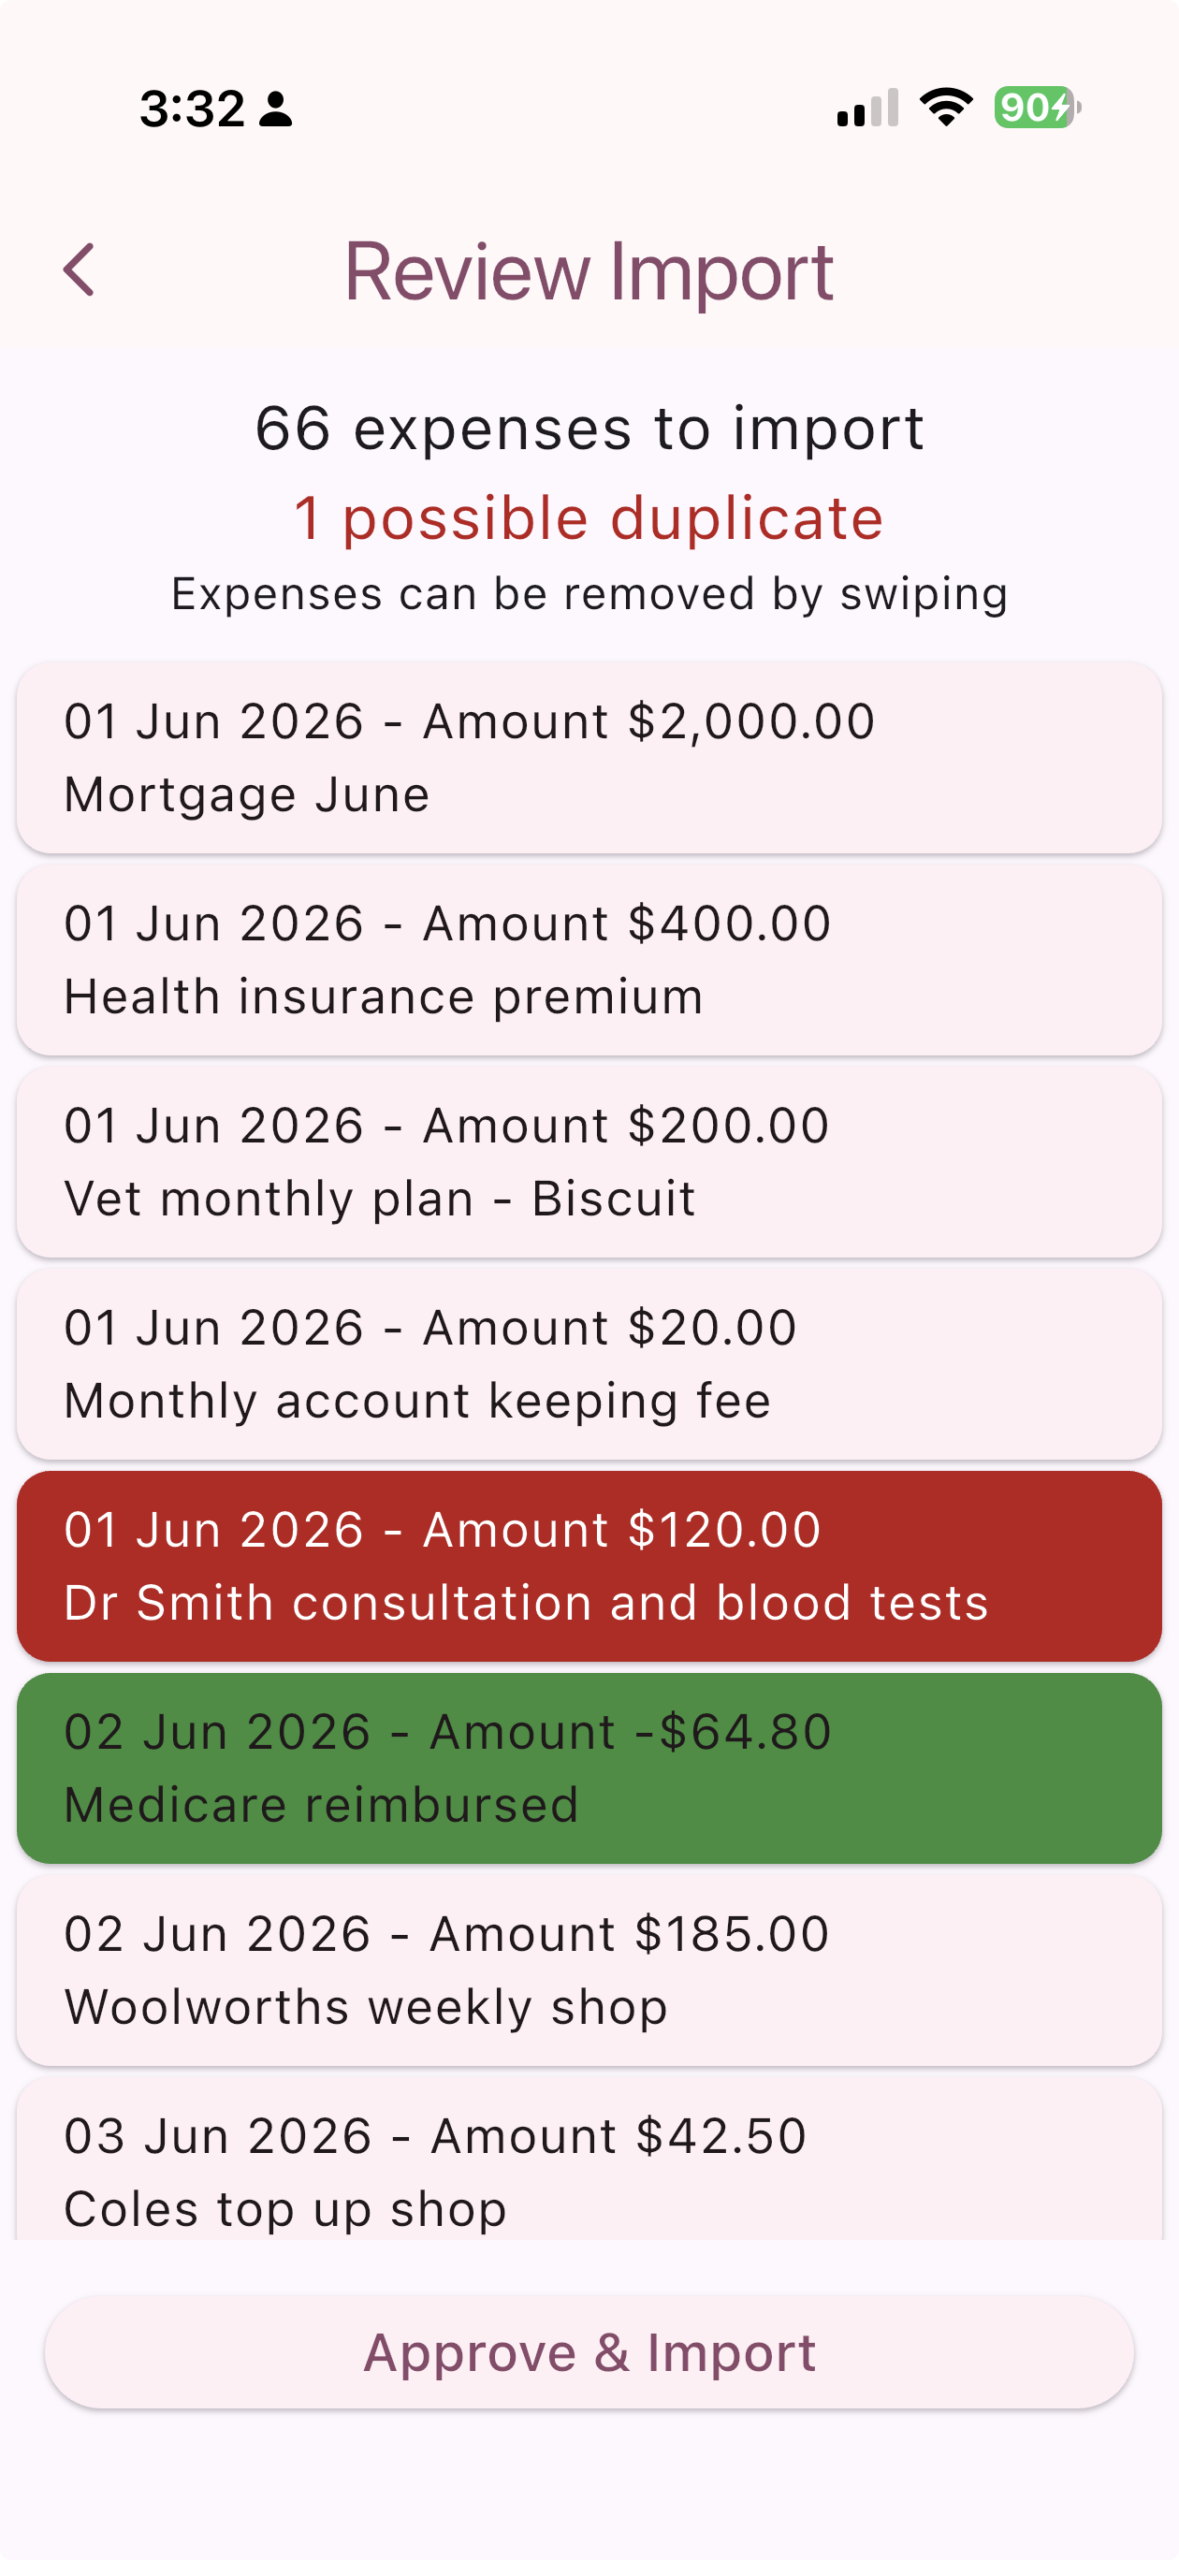
When the file has been processed you'll see a list of the expenses to be imported. Credits are shown in green, and any expenses that appear to be duplicates of expense that are already in the application are highlighted in red. Any of these expenses can be removed before import by swiping them away. If you make a mistake at this point, just go back to the menu and start again.
Once you're happy with the expenses, tap the 'Approve and Import' button and they'll be added for you.
Categorisation Rules
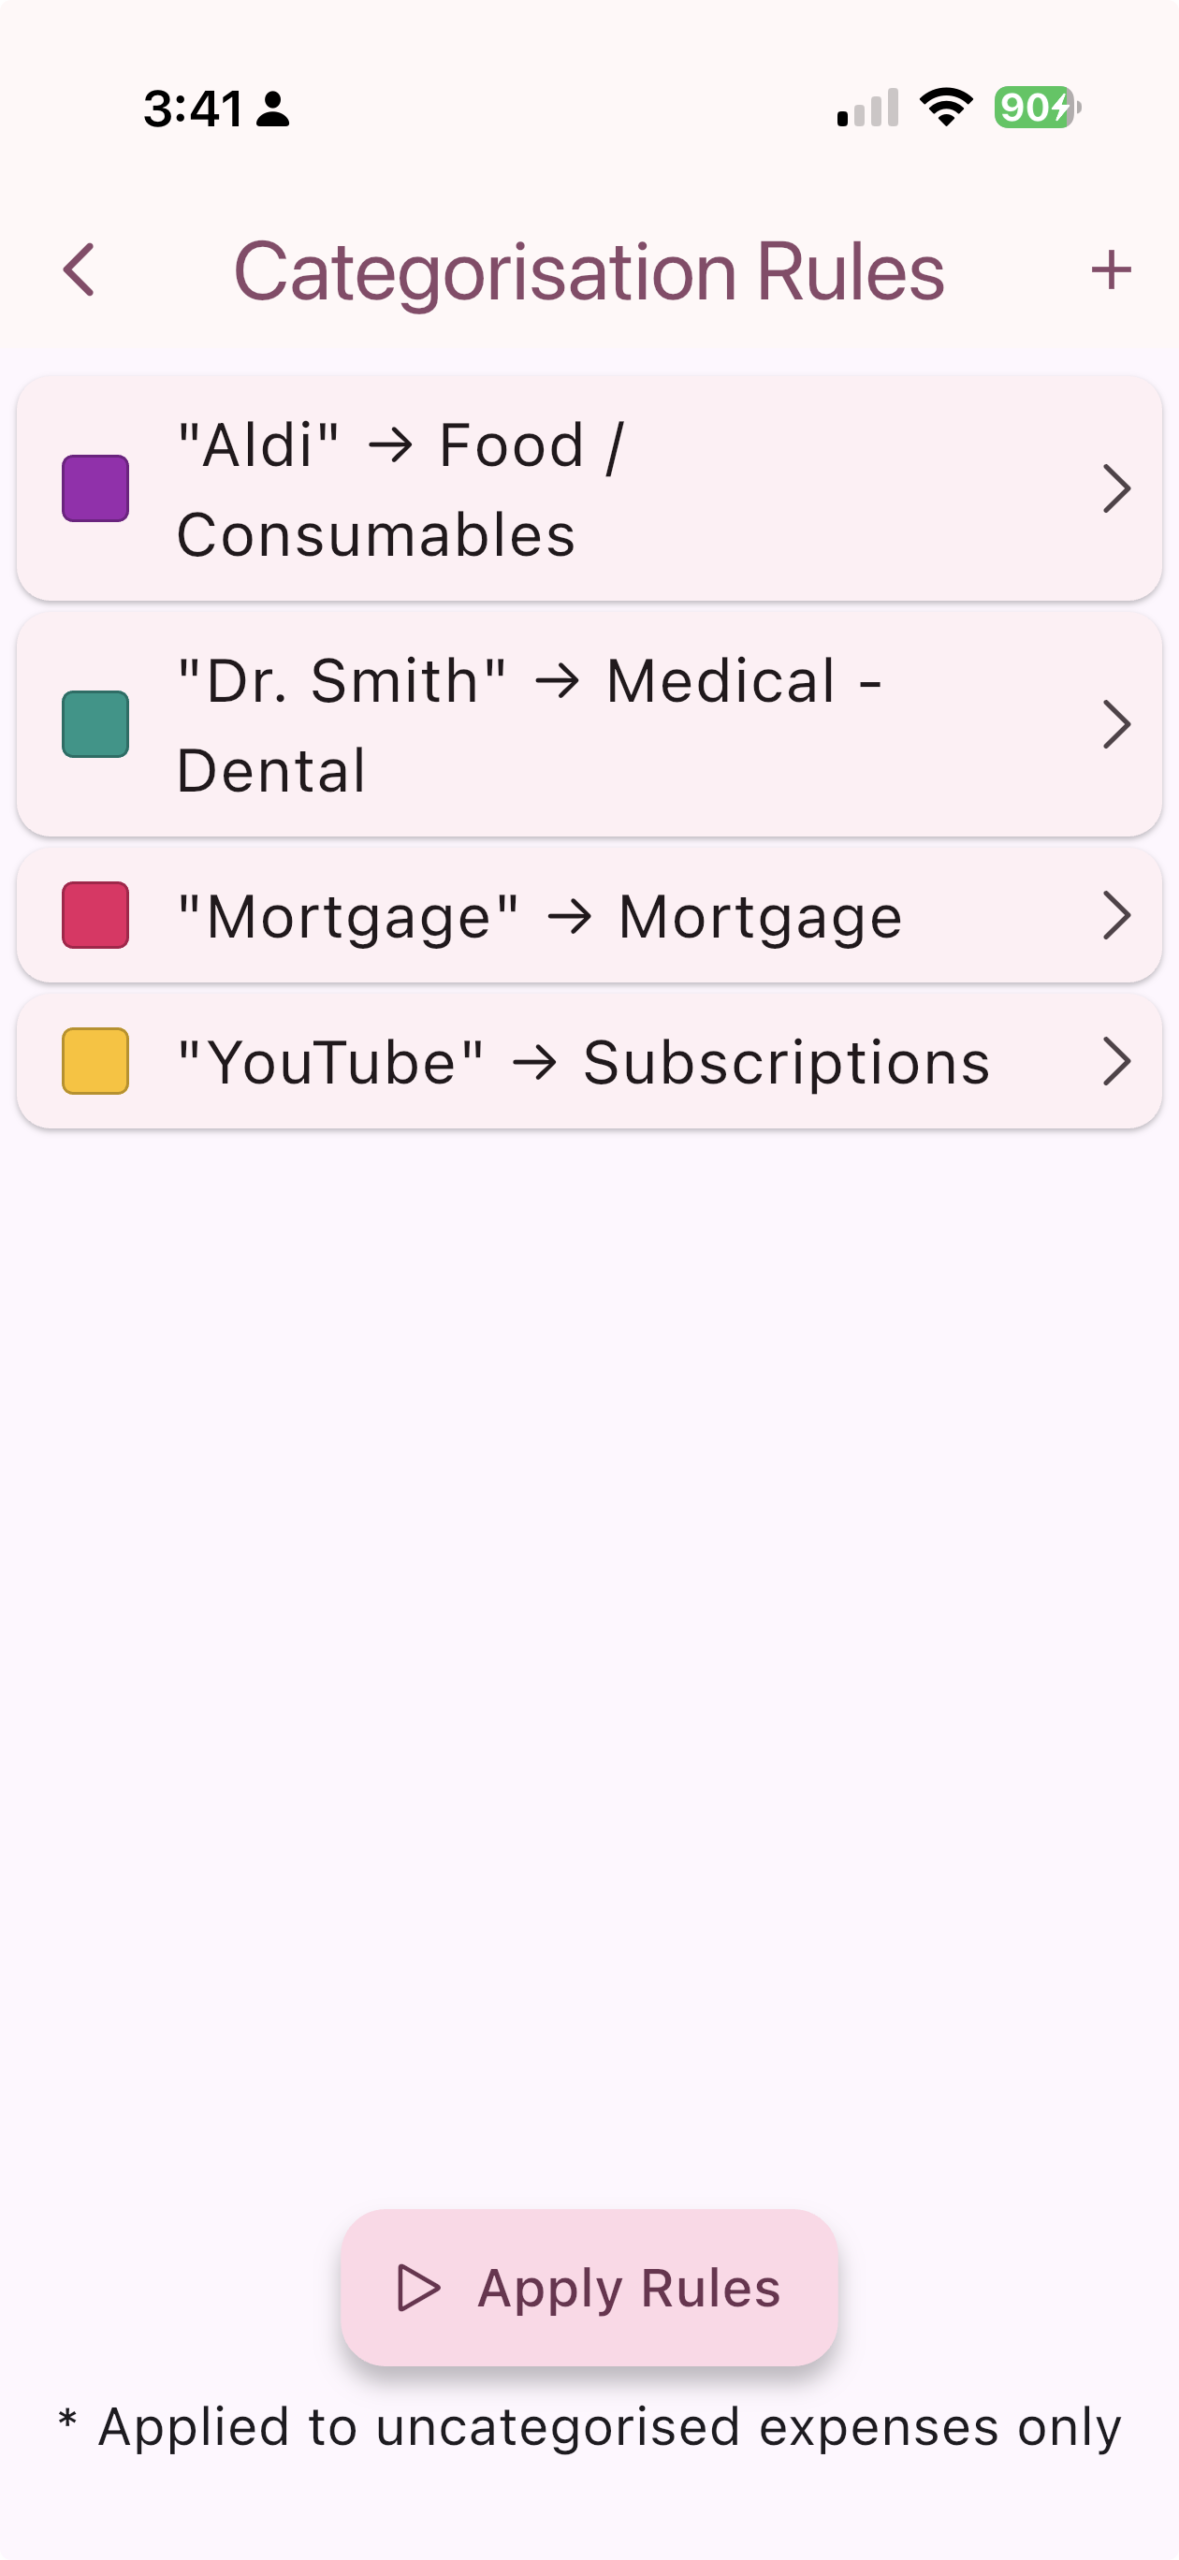
When expenses are imported via CSV they are automatically put into the 'Uncategorised' category. Rather than going through potentially hundreds of expenses and manually editing them to categorise them all, you can use categorisation rules to speed this up.
There are two ways to add these rules, either manually through this screen or directly from the Edit Expense screen.
To add a new rule, tap the + icon at the top right of the Categorisation Rules screen and you'll be taken to the Add Categorisation Rule screen. Enter the details for your new rule. This will include the start of the description from an expense as well as the category you would like all other expenses that start with the same description to go to.
Description Starts With: This is the text that you want to compare against to categorise an expense. e.g. Dr Smith. When you run the rules using the 'Apply Rules' button any other expenses that also start with Dr Smith will go to the category selected.
Category: Select from any existing categories to determine what category any expenses starting with the above should go to.
To delete a rule, swipe on the Rule box and confirm you want to remove the rule.
The edit a rule, simply tap on the Rule Box and you'll be taken to the Edit Categorisation Rule screen.
Any time you import a new CSV or add a new rule you can tap the Apply Rules button to put any uncategorised expenses that match this starting description into the category.
Note: Apply Rules will only categorise uncategorised expenses. This is to ensure that any expenses that have been deliberately moved to another category will stay there.
Settings
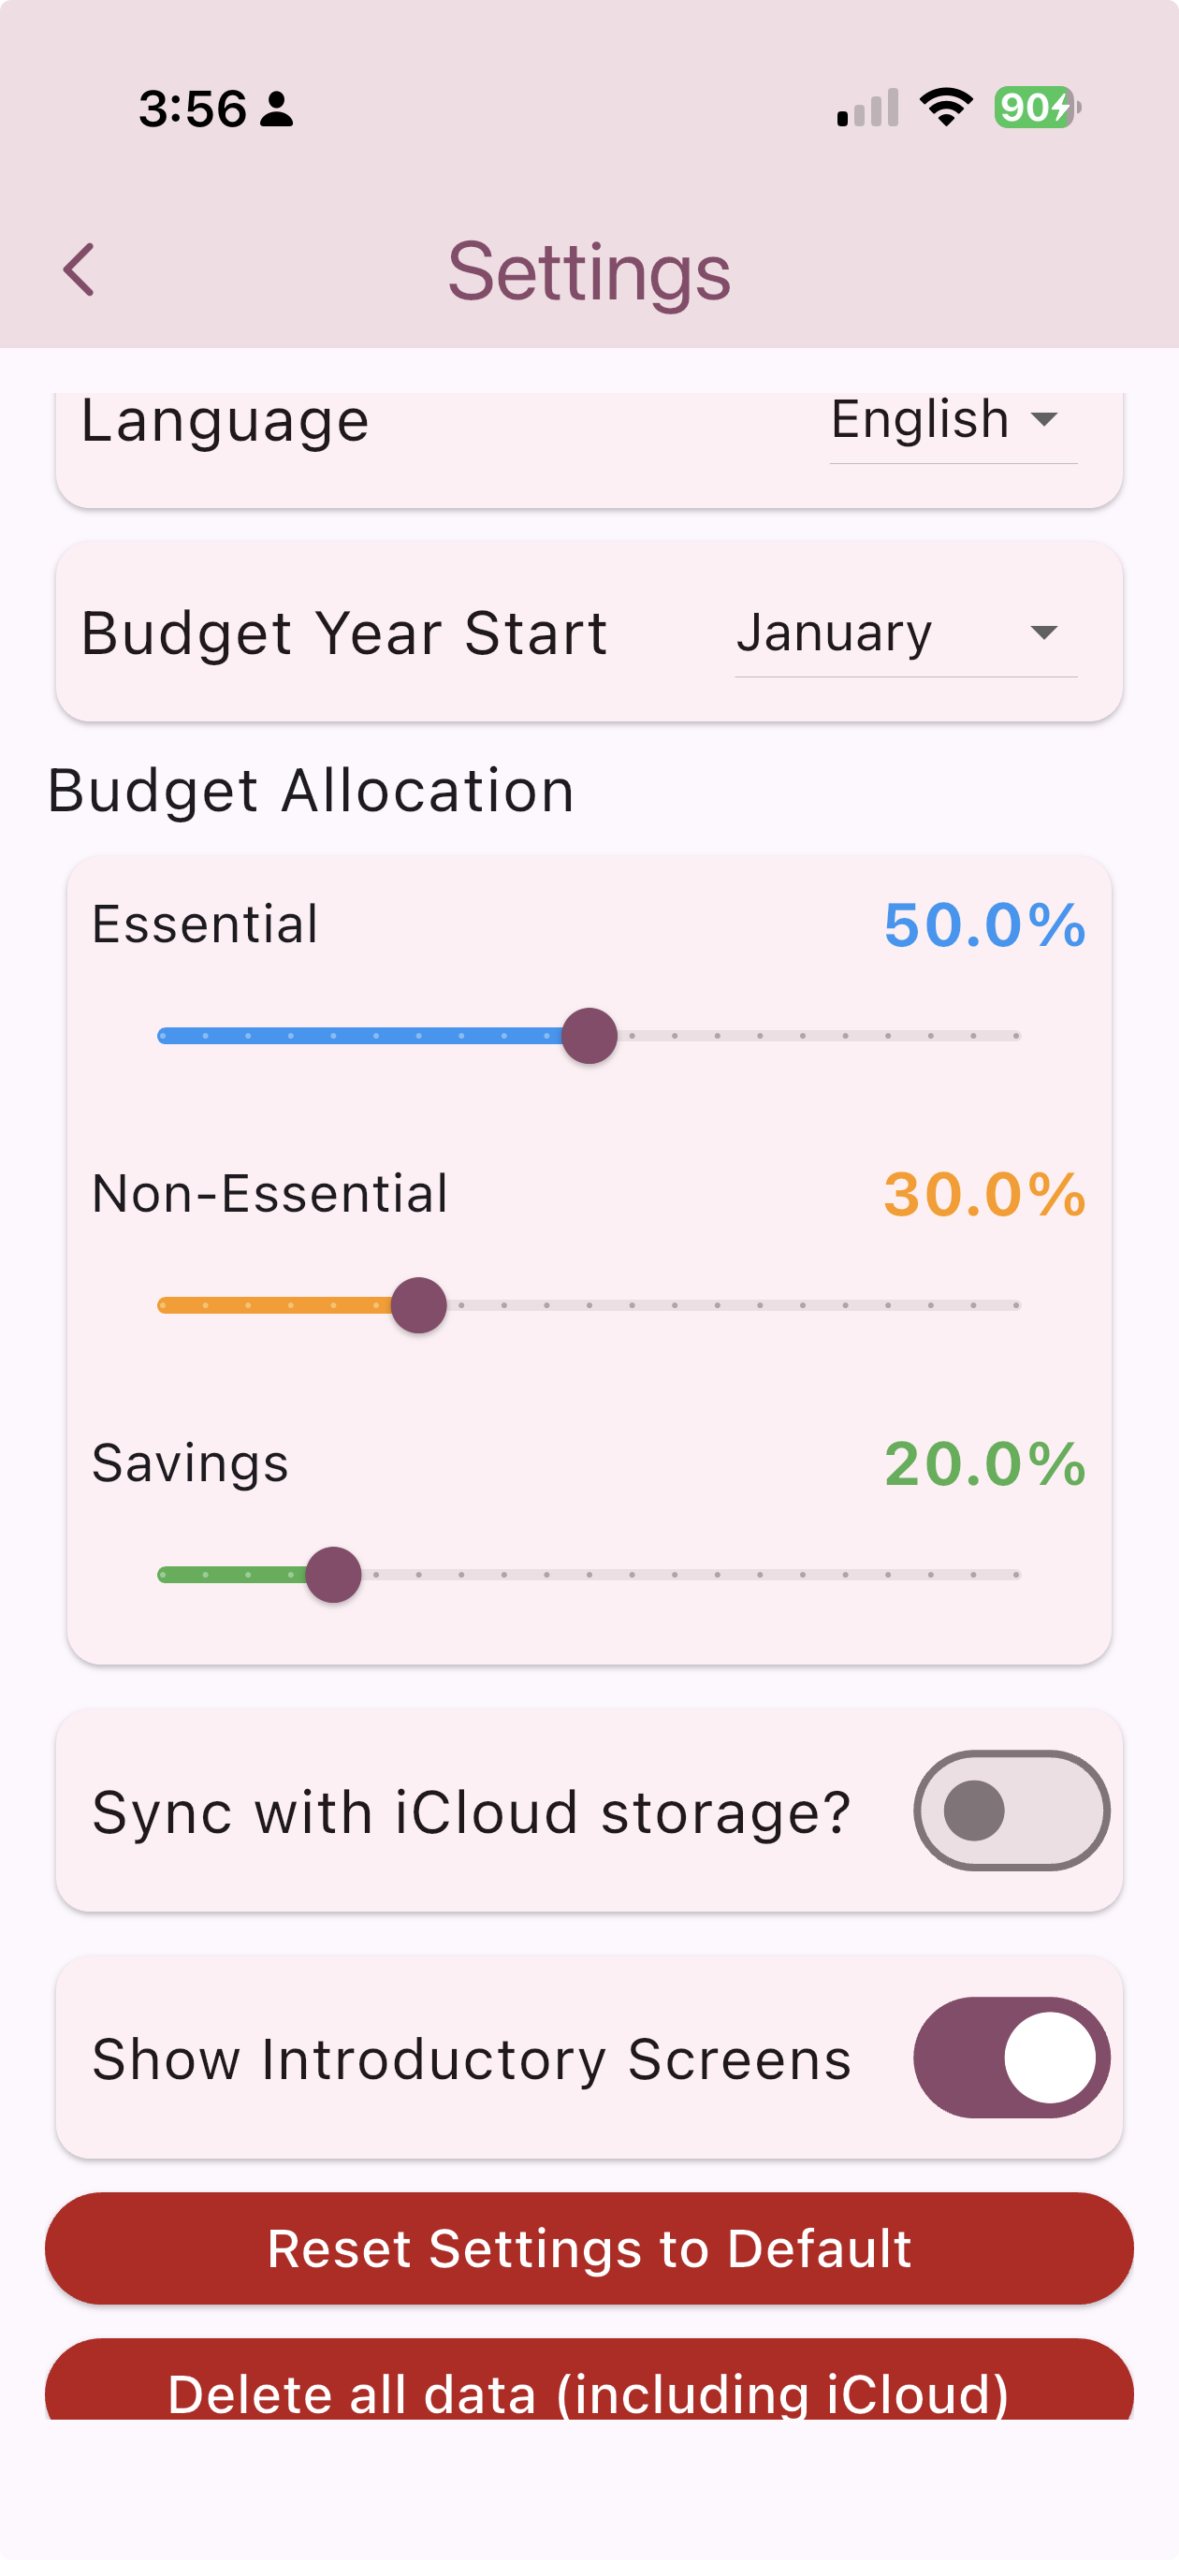
Language: You can select from either English or French. By default this will be set by the phone's language but it can be changed here.
Budget Year Start: You do not have to start an annual budget in January. If for example you start entering expenses from March and would like to see the projection from March onwards, or if you are tracking your budget by Financial Year, you can change the month here.
Budget Allocation: These sliders allow you to adjust how much you think you should be spending on each of the allocations. By default this is set to Essential, 50%, Non-essential, 30% and Savings, 20%. Change this as you see fit.
Sync with iCloud storage: Turning this on will save your data to iCloud and therefore allow for either data backups or to seamlessly use the app between multiple devices. Please note that syncing is done every minute and so will not be reflected immediately on your other device.
Show Introductory Screens: If you would like to view the introductory screens again the next time that the app starts, toggle this switch on.
Reset Settings to Default: This will reset the above to their default settings. This may be helpful if you have any issues with iCloud syncing.
Delete all data: This will remove any data that you have added to the app. If you are using iCloud it will also remove all the data from iCloud. Use this with caution!
Load Sample Data
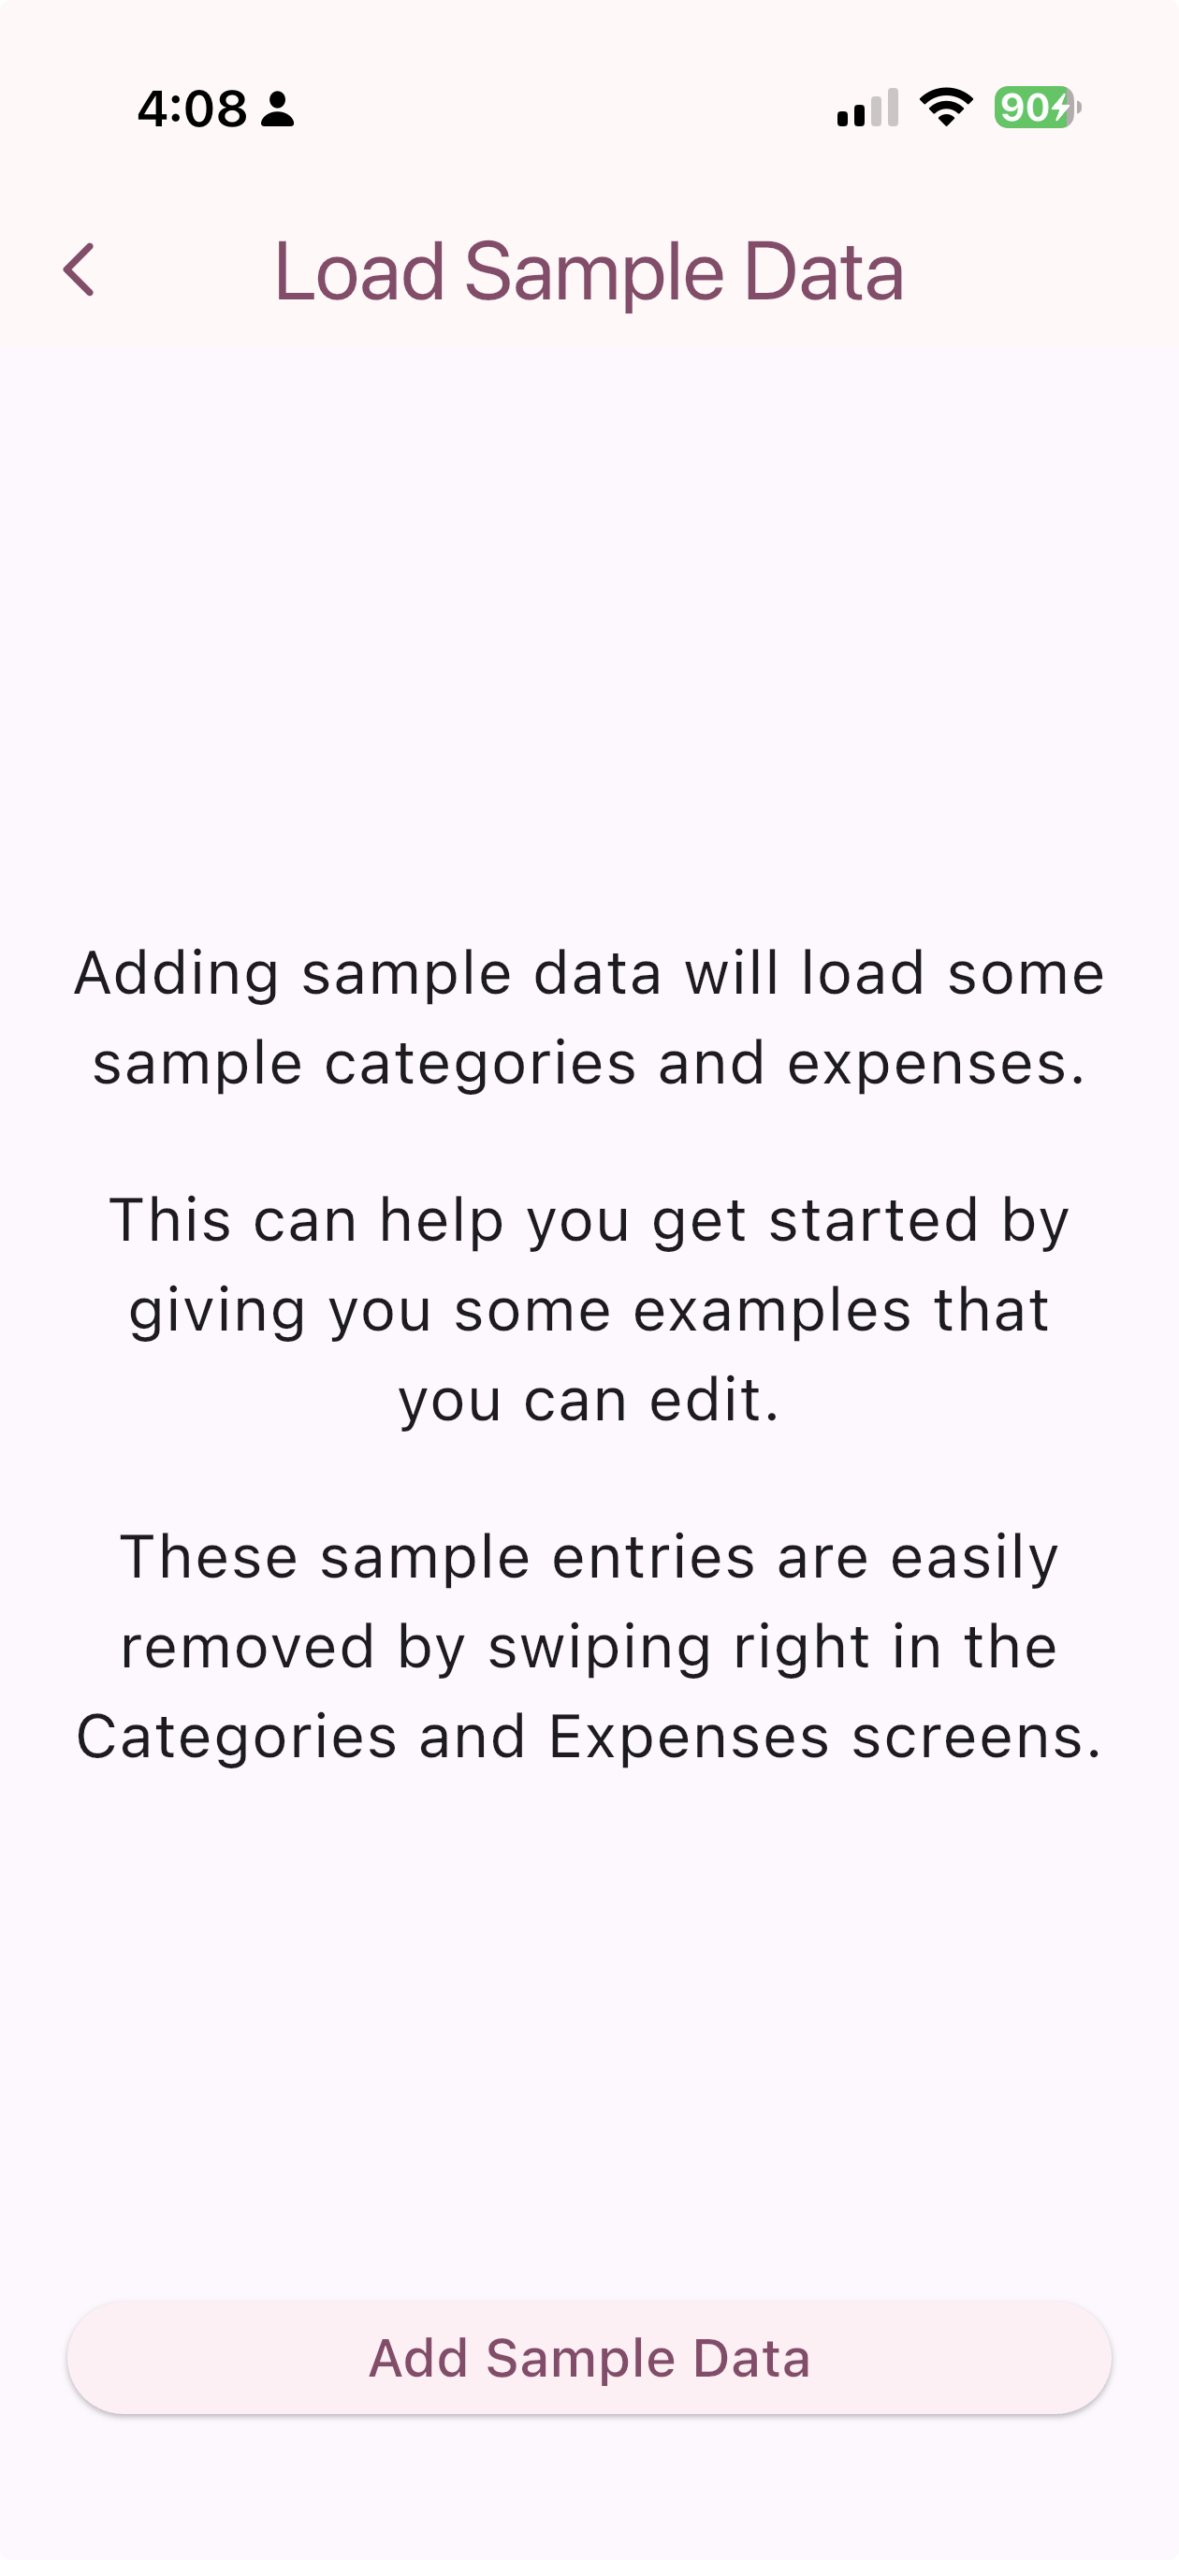
This screen is helpful for getting you started with using Watch My Wallet. Tapping the Add Sample Data button creates a few generic categories and expenses. These will have give you some suggestions as to how you might want to break up your expenses into categories that are meaningful to you.
At any time you can either swipe these away to remove them, or, if you've been playing around a bit and want to start again, you can go into the Settings menu and Delete all data.
About
The About page gives you a few useful links.
Email: Send an email to support with any enquiries or suggestions.
Privacy Policy: The privacy policy pertinent to this app.
Documentation: A link to this page.